
Raspberry Pi Network Boot Guide
Update
2022-02-19 - I've created a set of scripts that automate the Final Steps listed below, as well as help automate other administrative tasks. Read more in this companion article.
Introduction
In my spare cycles over the last couple of months, I've spent a significant amount of time refining my process for network booting Raspberry Pis on a Synology NAS. It took reading many other existing blogs, as well as the official Raspberry Pi network boot guide. In the end, I've figured out the nuances of booting a Pi 3B, Pi 3B+, and 4B on both NFS and iSCSI. While there are many guides out there on this subject, my goal is to bring all the secret sauce into one article that is comprehensive an geared toward Synology owners with home labs. This guide will also discuss some the challenges integrating RPi network boot with Google Wifi as the primary wireless Internet router, and some other lessons learned about my success or lack their of integrating network boot on an enterprise-grade switch vs. the typical unmanaged switches used in most home networks.
Prerequisites & Disclaimers
This is a reasonably advanced topic. If you are finding yourself getting lost with specific jargon, this may not be a good approach for you yet. While I have attempted to make this article very complete with safe command line and configuration syntax that can be copied into your own environment, you may damage the configuration of your home network, accidentally delete data, or cause ancillary problems (aka collateral damage). I offer no guarantees or support if following this guide does harm or doesn't yield your desired results. So, follow my practices at your own risk.
Synology references pertain to DSM 6.x Raspberry Pi OS references pertain to Debian Buster; however, I have successfully tested this methodology on the latest Raspberry Pi OS (Debian Bullseye) as well as on the 64-bit version of the OS and it works well.
Also, you should be leveraging firewalls on each of your endpoints, and especially on your Synology NAS. The proper configuration of these various host and device firewalls is automatically assumed and is not explicitly covered in this documentation.
Why network boot a Raspberry Pi?
There are a lot of reasons why someone would want to boot a Raspberry Pi (RPi) with network storage. For one, I have a number of projects that involve leveraging RPis for compute in my home lab. This has numerous advantages over virtual machines or more expensive PC builds in my home lab. RPis use less electricity, produce less waste heat, are a magnitude smaller than even the some of the smallest form factor PCs. For all of the benefits of the RPis, its weakest link is the use of micro SD memory cards as a primary root volume. While SD cards are very affordable and quite compact, they have a limited number of write cycles, and depending on how much you spend there are varying degrees of design quality that make things like wear-leveling and environmental tolerance a bit inconsistent across brands and manufacturers.
By network booting, Pis can offload their IO to a centralized source that has much faster drives without having to consume additional space, power, and complexity to use USB drive enclosures. In addition, when leveraging a NAS, your RPis can take advantage of advanced features like RAID-protected volumes, snapshots, replication, and cloud backup. For me, this is critical. I don't want to spend the time to build rich services in my home lab only to have the effort wiped out due to a failed SD card, human error, or environment factors. Network booting also allows you the ease of centralizing some of the configuration elements of your RPis in one place. This can save you time if you need to push configuration changes to multiple systems without interacting with them directly.
Why Synology?
If you are like me, you have already invested in a NAS or Network Attached Storage device for your home. My favorite brand is Synology. They are affordable offer a wide assortment of models, configurations, and features that are stable and consistent to deploy with easy. When I get home from work and have free time for technology-focused hobbies and research, the last thing I want to do is spend a lot of time wrestling with complexity.
Synology solved a lot of those problems for me for almost a decade, and depending on the model you purchase and how you configure the drives, it can become the centerpiece of your home lab / media center too. My preference has been for the 'Plus' series models, as they typically have the widest assortment of configurations that allow for external expansion units, as well allowing users to easily upgrade RAM and make simple internal repairs. My current primary model is a DS716+, so it is neither the newest or the oldest model on the block.
In the case of this guide, any model Synology model should support the basic features required in this guide. If you have a different NAS model from a different manufacturer or you've assembled your own, you can probably piece together your requirements by follow the same logic; however, it may not be as plug and play.
Which Raspberry Pis models are covered in this guide?
I will cover the nuances of booting the following three models:
- Raspberry Pi 3 Model B
- Raspberry Pi 3 Model B+
- Raspberry Pi 4 Model B
I will also explain how to use the Raspberry Pi Zero W to workaround specific technical challenges that may or may not exist in your environment; however, the RPi Zero W lacks an integrated Ethernet NIC, so it is not capable of network boot and will require the use of an SD card.
Which OSes will you cover in this guide?
I will exclusively cover using Raspberry Pi OS (Raspbian) that is based on Debian 10 (Buster), as it is the current officially supported OS from the Raspberry Pi Foundation.
In general, how do Raspberry Pis network boot?
While there nuances between each RPi model that impact the network boot process, they all more or less follow, or try to follow, the same overall process. I've created a diagram that I've attached below to illustrate the common process:
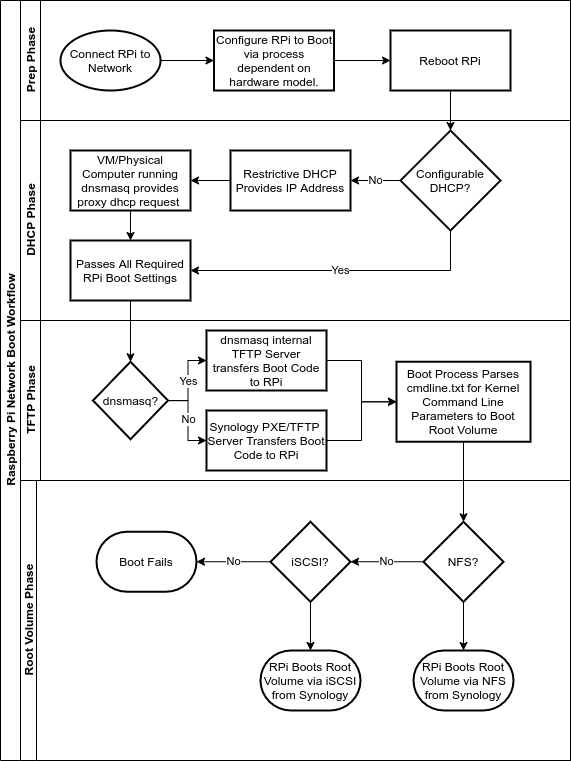
Raspberry Pi Boot Process
Preparing the RPi 3B for network boot
There are few things that have to happen with the older RPi 3B to prepare it for network boot, as well as getting it to consistently boot from the network. They are as follows:
- Write a Raspberry Pi OS (Lite) image to an SD Card and boot the RPi 3B.
- Log in as the default pi user and check if the RPi 3B is configured for set to the correct USB boot mode:
$ vcgencmd otp_dump | grep 17: 17:1020000a - The return value must be 17:3020000a
- If the return value is not 17:3020000a, set the USB boot mode in your OTP memory to the correct value, by adding the following to the bottom of your /boot/config.txt:
program_usb_boot_mode=1 - Reboot
- After rebooting, you should be able to verify that the USB boot mode is now properly set by running the vcgencmd from Step 2.
- Once verified, you can remove the line you added in Step 4 from your /boot/config.txt
Now your RPi 3B should be capable of booting off of the network. This can be tested by booting without the SD Card. You should notice that the NIC will now initialize without an SD card present.
While it may seem like you are done with prep at this point, there is one critical caveat that effects this particular model. While it is now possible to network boot without the SD card, there are several hardcoded bugs that make this experience inconsistent and problematic on this model. In order to boot consistently off of the network, you will need to format an SD card with FAT32 and copy the bootcode.bin file to it. Next, you will need to place that SD card back into your RPi 3B in order to consistently network boot without errors, hangs, or weird other quirks.
The good news is that this SD card will only be used to read the bootcode.bin file to step around the hardcoded bugs in this particular model that often cause network boot to fail and nothing else. Any SD card that can handle the environment where the the RPi 3B will be installed should be suitable for this task.
The bad news is that there is no way to trust this configuration without still leveraging an SD card. Also, the RPi 3B only supports a 100Mbit NIC, compared to the 3B+ and 4B which support 1Gbit NICs. That said, the 3B is still a great RPi for certain workloads and it will consistently perform well if you can deal with the slower NIC and SD card caveat.
Congrats, this model is now prepared to network boot!
Preparing the RPi 3B+ for network boot
In general, these are fairly easy to configure for network boot, as most of the earlier bugs concerning this platform have been resolved. They are as follows:
- Write a Raspberry Pi OS (Lite) image to an SD Card and boot the RPi
- Log in as the default pi user and check if the RPi 3B+ is configured for set to the correct USB boot mode:
$ vcgencmd otp_dump | grep 17: 17:1020000a - The return value must be
17:3020000a - If the return value is not 17:3020000a, set the USB boot mode in your OTP memory to the correct value, by adding the following to the bottom of your /boot/config.txt:
program_usb_boot_mode=1 - Reboot
- After rebooting, you should be able to verify that the USB boot mode is now properly set by running the vcgencmd from Step 2.
- Once verified, you can remove the line you added in Step 4 from your /boot/config.txt
Unlike the RPi 3B, the 3B+ will consistently boot without an SD card containing bootcode.bin. Congrats, this model is now prepared to network boot!
Preparing the RPi 4B for network boot
In general, these are the easiest to configure for network boot and provide the best visual feedback; however, depending on when it was fabricated you may have to have to update the eeprom code prior to successfully achieving network boot.
- Write a Raspberry Pi OS (Lite) image to an SD Card and boot the RPi 4B.
- Log in as the default pi user and use raspi-config to set your RPi 4B to boot from the network if an SD card isn't present or bootable:
$ sudo raspi-config - Select Advanced Options
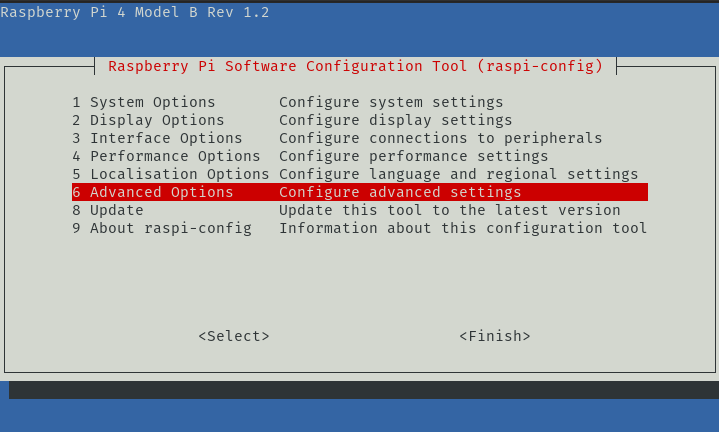
- Select Bootloader Version

- Select Latest and let raspi-config download and write the latest bootloader.

- Return to the Advanced Options from Step #3
- Select Boot Order
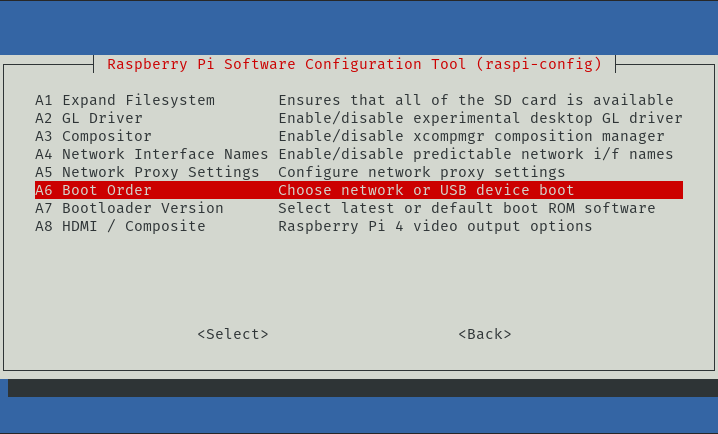
- Select Network Boot

- This will program the RPi 4B to attempt to boot from the network when the SD Card is not present.
Unlike the RPi 3B, the 3B+ and 4B will consistently boot without an SD card containing bootcode.bin. Congrats, this model is now prepared to network boot!

My RPis are prepped, now what?
Well, that wasn't too bad, was it? Now it's time prepare your environment. In the next section, we'll prepare the local area network, our Synology NAS, and the auxiliary services that actually will facilitate network boot.
Storage Overview
Regardless of your configuration, you will need the following services setup and configured on your NAS:
NFS File Services
You will need one share dedicated to host TFTP Boot Files. I call my share tftpboot. It is best if this share is exclusively reserved for use by NFS only.
You will need to manage specific NFS permissions on this share for each RPi you wish to host, as well as the dnsmasq server if you decide to use one.
iSCSI Services
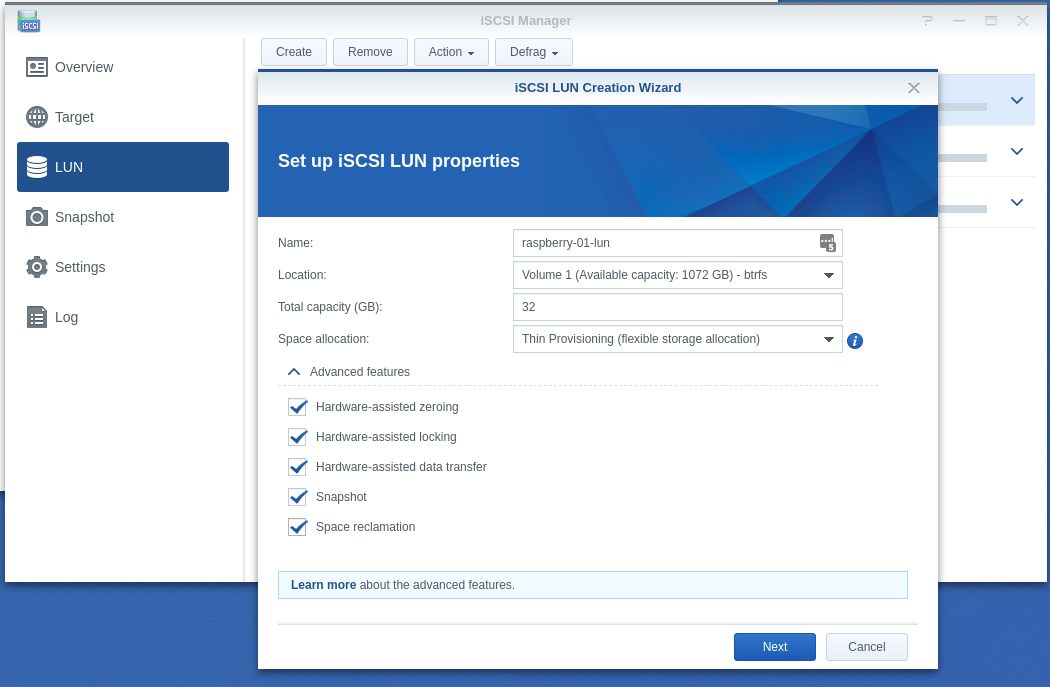
I recommend that you create a single iSCSI Target and LUN for each RPi you plan to boot. Additional LUNs can be added later, but that is beyond the scope of this article.
For the root volume LUN, I recommend a 32GB LUN size, as it will be more than adequate for the OS, most basic application and server workloads, logging, and a small swap file.
I make use of thin provisioning and advanced BTRFS features, but some of these features vary between NAS model numbers and your choice here will not impact overall functionality. Also, using thick provisioning and EXT4 will always yield better performance, but I accept the performance hit for all the BTRFS features.
Storage Recommendations
I have had great success running multiple Raspberry Pis off of a pair of mirrored SATA drives (Seagate IronWolf) using Synology Hybrid RAID, as well as many other Synology services. I generally create a storage pool for maximum flexibility vs. a straight volume. For those of you unfamiliar with Synology Storage Pools, it is a specific configuration that must be chose when you setup your NAS. Implementing it later will require additional steps, and it isn't required for this anything covered in this guide.
If you have the physical expansion capacity, as well as budget, you may want to consider adding SSD drives, and possibly NVME drives on new models, to either host volumes or provide read/write caching.
While I have no trouble with just plain old SATA drives, my RPis are not necessarily IO-intensive. If you plan on running database or IOPS intensive workloads, you will want to have an SSD dedicated storage tier and possibly some more advanced caching features.
In my case, I have a dedicated computer with SSD that I use in my home lab to host databases on. This helps offload IO from the NAS and on to SSD. I then use the NAS as a backup target to store periodic database backups. Kubernetes is IO-intensive. I use the k3s implementation of Kubernetes from Rancher Labs/SuSE to power my RPi-based cluster. k3s allows the role of etcd to be offloaded to a external database. This works perfect for me, as it keeps all of the cluster-critical IO on SSD, while using the Synology for caching container images and logging. It's also pretty helpful for other more common use cases, since the database services are typically where the bulk of IO occurs.
When I eventually upgrade my current Synology NAS, I intend to invest in a 4-bay model and have 2 mirrored SSD drives for application workloads and 2 for SATA.
Synology Storage Configuration
NFS Configuration
- Enable NFS Service and configure Advance Settings:

- Create a share called tftpboot.
- Edit the settings on the share:


- Leave the Permissions/Advanced Permissions on their default settings.
- In the NFS Permissions, add the following entry for your dnsmasq server (if you have one):

- Also in the NFS Permission, add an entry for each RPi that you wish to boot off the network:

Next, you will correct UNIX file permissions and ownership on the directory structure. I've found the easiest way to do this is to ssh into the Synology directly by enabling SSH via the Terminal & SNMP menu in the control panel.
Once you SSH into the Synology with an admin-level user account, elevate to root:
$ sudo -i
As root, change directories to the volume that is holds the tftpboot share (example: Volume 1):
# cd /volume1
Ensure that the root user and group own the shared folder and reset the default permissions:
# chown root:root tftpboot
# chmod -R 0755 tftpboot
- Stop working on NFS for now. Now it is time to configure the necessary iSCSI components.
iSCSI Configuration For performance and to reduce overhead, I do not recommend setting up CHAP authentication and CRC checksums. These features are overkill for most home environments and will degrade performance and add additional complexity.
Some blogs recommend enabling "multiple sessions". This setting is not correct and this setting should remain disabled.
Here's Synology's official documentation:
Multiple Sessions: Allow multiple sessions from more than one initiator to connect to the same target at the same time. To protect your files from corruption or unexpected data loss, it is strongly suggested that you use a shared file system or cluster system such as VMware Virtual Machine File System (VMFS) and Oracle Cluster File System (OCFS).
Also, while this guide recommends thin provisioned LUNs with all advanced features enabled for flexibility, these advanced options are not required to support network booting and may not be available on your specific NAS model, or may be unavailable based on how you have configured your disk groups, volumes or file systems. Thick provisioning will result in higher performance and lower fragmentation, but it will immediately consume capacity equal to the maximum capacity of the LUN. Thin provisioning will only consume space as you use and consume it. The advanced features available with thin provisioning will allow you to potentially reclaim unused space back to the supporting volume, as well as leverage snapshots for additional recovery options.
- Configuring iSCSI targets


- Configuring LUN & Map LUN to Existing Target


- Review iSCSI target settings and ensure that the default mask is set to no access:

Repeat these steps for each RPi, assigning a unique iSCSI Target Name, IQN, and LUN to each RPi that you wish to setup.
We will revisit the iSCSI Manager in a later step to finalize the masking configuration in order allow the RPi to connect to the target with the unique initiator provided by the Raspberry Pi OS. While you can complete the masking step by specifying your own unique initiator name in advance, I tend to use the open-iscsi provided default initiator name, as it is unique and obscure enough for home use to prevent name collisions that can easily happen with less complicated names while iterating changes.
Network Preparation
It has been my experience, that Raspberry Pis, especially pre-4B models are a little kludgy in how they implement network boot and its Ethernet-based NIC. Therefore, I'm here to share a few basic tips to aid in your success:
- Don't connect the Raspberry Pis to an enterprise-grade managed switch. In my case, I found that leveraging a modern HPE Procurve, even with most port-specific features and services disabled, resulted in the RPis not fully initializing and attempting DHCP requests. What ultimately solved all my issues was hosting my RPis on a cheap unmanaged switch which I then uplink to the HPE Procurve. In my case, the brand of unmanaged switch that I used was TP-Link, but any should work.
Most home networks make use of DHCP to ease with network configuration. The DHCP on home networks is generally provided by the Internet router. Most of these routers lack the advanced configuration of the DHCP service which is required by the RPis for network boot. If that's the case, you have 2 choices:
- Disable DHCP on your router, and move DHCP services to your Synology NAS.
- Leverage a VM or computer on your network capable of hosting a dnsmasq server which can proxy additional information required for network booting RPis in combination with your existing DHCP server.
- Leverage DHCP reservations for consistency of configuration. While it is possible to not use reservations, it makes the storage preparation and maintenance easier.
While it is possible to split scopes between multiple DHCP servers to increase redundancy, it is beyond the scope of this article and I will not be covering it. For my second tip, I've extensively tested when all DHCP/PXE/TFTP is controlled by the Synology with great success, as well as tested the use of a dnsmasq server to proxy additional DHCP information and handle PXE/TFTP functions. Again, it is beyond the scope of this article to explain more advanced hybrid approaches.
Option 1 - Move DHCP Services to your Synology NAS
This is fairly straight-forward until you get into the weeds of the configuration. Here are an outline of steps and some screenshots, where applicable, that will help you with the configuration steps on the Synology end of things:
- First, you will want to set a static IP address for the interface on your NAS that will be hosting the DHCP Server.
- Afterwards, you will need to enable the DHCP Server and define your scope(s) with all relevant basic network settings (dns, default gateway, etc).
- Create a share for your TFTP Boot Files (ex: tftpboot).
- Enable the TFTP Service and take the defaults advanced settings.

- Copy bootcode.bin to the root of your share for TFP Boot File (ex: tftpboot). It's located on your SD Card image in /boot.
- Enable PXE Boot section within the DHCP Server Menu.

- Configure the additional configuration required by the RPis in the Vendor section within the DHCP Server Menu. (This is a critical step that cannot be skipped)

Option 2 - Configure a dnsmasq server
dnsmasq is an incredibly powerful service that we will leverage to do the following:
- Proxy additional information to clients that compliments the existing DHCP server configuration info on your network. This will eliminate the need to modify existing DHCP services.
- We also host TFTP/PXE services from this system that will front-end the Synology NAS-based TFTP Boot File over NFS.
On the VM or physical computer of your choice, install a Linux distribution of your choice. In my case, I leveraged an underutilized RPi Zero W that existed on my network as an NGINX-based load balancer. While the WIFI adapter of the RPi Zero W is a bit of a bottleneck, I personally care more about reliability than boot speed. Feel free to select a VM or physical computer that works best for you. A wired system will most likely yield the best performance and lowest boot times. Once selected, please follow these steps:
- Install Linux
- As root, create a mount point for the TFTP Boot Files on the Synology. (ex: /mnt/tftpboot)
- Add a persistent NFS mount to /etc/fstab to your Synology. Here's an example where 192.168.0.25 is the IP address of the Synology:
192.168.0.25:/volume1/tftpboot /mnt/tftpboot nfs defaults,vers=3,rsize=32768,wsize=32768 0 0
- Using your distribution's package manager, install dnsmasq.
Locate your dnsmasq.conf and replace it (as root) with the following and modify the dhcp-range value to match the broadcast address of your home network:
port=0
 # dhcp-range's IP address should be set to the broadcast address of your existing home network.
 dhcp-range=192.168.0.255,proxy
 log-dhcp
 enable-tftp
 tftp-root=/mnt/tftpboot
 pxe-service=0,"Raspberry Pi Boot"
 # Delays sending DHCPOFFER and proxydhcp replies for at least the specified number of seconds.
 dhcp-mac=set:raspberry_pi,B8:27:EB:*:*:*
 dhcp-reply-delay=tag:raspberry_pi,2
Next, stop and restart dnsmasq:
$ sudo systemctl stop dnsmasq
$ sudo systemctl start dnsmasq
- Your dnsmasq server is ready to go.
Final Steps
Finally, we will boot our RPi again normally off of the SD Card with a clean Raspberry PI OS Buster Lite image and then transfer boot and operating system files to the Synology. I would recommend configuring each RPi individually, as well as attaching each RPI to a display to assist with troubleshooting until you confirm that everything is working. Here are our final configuration steps:
- If you have have only been dealing with one RPi, then feel free to reuse the SD card from earlier; however, if you have been recycling the same SD for preparing multiple RPis, then wipe and re-image the card again. **You will need to wipe and rewrite the Raspberry Pi OS Buster Lite image after completion of this procedure, or manually regenerate various encryption keys (ex: ssh) which are generated on first boot.
- On the SD Card, go into the boot folder and create a blank file called ssh or ssh.txt. This file triggers the RPi to automatically accept SSH-based connections on boot. This will save you from having to attach a keyboard, and can ease setup.
- Set a DHCP Reservation for the PI and take note of the IP address.
- Boot RPi off of a clean Raspberry PI OS Buster Lite image and verify connectivity, by connecting via SSH to the device. (Remember, the default user will be pi and the default password is raspberry)
- Use raspi-config to configure your hostname, locale, time zone, keyboard layout, and WIFI country. (Note: To configure local keyboard layout, you will have to have a keyboard attached. If your are leveraging SSH, you can skip the keyboard layout for now.)
- Reboot
Next, lets update our apt package lists and dependencies from our repositories and then update all packages, kernel, etc to latest stable version:
$ sudo apt-get update$ sudo apt-get full-upgrade
- Reboot
Install open-iscsi:
$ sudo apt-get install open-iscsi
Determine the default generated initiator name:
$ sudo cat /etc/iscsi/initiatorname.iscsi
## DO NOT EDIT OR REMOVE THIS FILE!
## If you remove this file, the iSCSI daemon will not start.
## If you change the InitiatorName, existing access control lists
## may reject this initiator.  The InitiatorName must be unique
## for each iSCSI initiator.  Do NOT duplicate iSCSI     InitiatorNames.
InitiatorName=iqn.1993-08.org.debian:01:a17ea0b81be9
(ex: Initiator name above is iqn.1993-08.org.debian:01:a17ea0b81be9)
- Finalize your Synology's iSCSI configuration by returning to iSCSI manager and inserting your initiator name as a Read/Write mask under the corresponding iSCSI target in the iSCSI Manager's Masking Submenu:

- Also, review the Network Binding Submenu. By default, all network interfaces will be selected, but in many cases most home users will probably be only using a single interface with their Synology. If that is the case, select the appropriate entry:

- Take note of your iSCSI Target IQN.
- Save your iSCSI Manager Settings and return to your RPi SSH session.
Discover your iSCSI Targets:
$ sudo iscsiadm -m discovery -t sendtargets -p <IP_OF_YOUR_SYNOLOGY_iSCSI_BINDING>
The output of the previous command will vary depending on how many iSCSI Targets you have configured. Next, logon to your iSCSI Target:
$ sudo iscsiadm -m node -l -T <TARGET_IQN> -p <IP_OF_YOUR_SYNOLOGY_iSCSI_BINDING>
- Check your /var/log/messages to see if you've successfully logged into your iSCSI Target. Your disk will most likely will be named /dev/sda.
The iSCSI kernel drivers are not included with the default Raspberry Pi OS Kernel. As a result, you will need to create an initrd image that includes the missing components. First, inform initramfs to include the iSCSI module by creating the following file:
$ sudo touch /etc/iscsi/iscsi.initramfs
Next, create the new initramfs image for your current kernel:
$ sudo update-initramfs -v -k `uname -r` -c
Now take note of your initrd image filename by using the following command, as we will use soon:
$ ls -lrt /boot/init*
-rwxr-xr-x 1 root root 9261831 Jun 20 14:57 /boot/initrd.img-5.10.17-v7+
Next, take note of your RPi's 8 character serial number (the preceding zeros can be omitted) with the following command, as we will use it soon:
$ grep Serial /proc/cpuinfo
Next, we will temporarily mount the tftpboot share on the RPi by using the following command (assuming that your tftpboot share is on volume1):
$ sudo mount -t nfs -o defaults <IP_OF_YOUR_SYNOLOGY>:/volume1/tftpboot /mnt
After mounting the root of the tftpboot share, our next step is to copy the universal RPi bootcode.bin to the root of the tftpboot share. bootcode.bin is used by all RPi models and must be in the root of this share for network-based boot to succeed:
$ sudo cp /boot/bootcode.bin /mnt
Next recalling your notes, create a folder that matches the serial number (8 characters) without the preceding zeroes of the RPi:
$ sudo mkdir /mnt/<RPI_Serial>
- Clone your /boot partition to the folder that was created in the preceding step:
$ sudo rsync -avhP /boot/ /mnt/<RPI_Serial>
- Once the clone is complete, edit /mnt/RPI_Serial/config.txt and include the following line at the end of the file:
Example:initramfs <INITRD_IMAGE_FILENAME> followkernelinitramfs initrd.img-5.10.17-v7+ followkernel
Next, we need to format and write a filesystem to our iSCSI LUN (the following command assumes /dev/sda as the root volume ):
$ sudo mkfs.ext4 /dev/sda
Now retrieve and take note of your iSCSI LUN's UUID. We will use this shortly to configure additional parameters:
$ sudo blkid /dev/sda
Next, we must configure the kernel cmdline required to boot the root volume off of the iSCSI LUN. Edit /mnt/RPI_Serial/cmdline.txt and delete or comment out the first line, while adding the following, while modifying the specifics to settings from notes. These parameters must exist on a single line:
ip=::::<hostname>:eth0:dhcp
root=UUID=<iSCSI_LUN_UUID>
ISCSI_INITIATOR=<RPI_INITIATOR_IQN>
ISCSI_TARGET_NAME=<iSCSI_TARGET_IQN>
ISCSI_TARGET_IP=<IP_OF_YOUR_SYNOLOGY_iSCSI_BINDING>
ISCSI_TARGET_PORT=3260
rw
Example of a complete file (where the preexisting line was deleted):
dwc_otg.lpm_enable=0 console=serial0,115200 console=tty1 ip=::::raspberrypi:eth0:dhcp root=UUID=747d83a1-01e9-480f-aed4-befb97a85e48 rootfstype=ext4 elevator=deadline fsck.repair=yes rootwait ISCSI_INITIATOR=iqn.1993-08.org.debian:01:a17ea0b81be9 ISCSI_TARGET_NAME=iqn.2000-01.com.synology:NAS.raspberry-01.2fdf1b5d6f ISCSI_TARGET_IP=192.168.0.5 ISCSI_TARGET_PORT=3260 rw
Configuration of the tftpboot share is completed. Now we need to complete the configuration of our iSCSI LUN which will function as our root volume. Unmount the NFS share currently mounted on /mnt and mount the iSCSI LUN:
$ sudo umount /mnt
$ sudo mount -t ext4 -o defaults /dev/sda /mnt
Clone the OS from SD Card to your iSCSI LUN excluding special directories and then recreate the special directories as blank directories:
Clone
$ sudo rsync -avhP --exclude /boot --exclude /proc --exclude /sys --exclude /dev --exclude /mnt / /mnt/Recreate Special Directories
$ sudo mkdir /mnt/{dev,proc,sys,boot,mnt}
Finally, you'll need to modify the fstab file on your iSCSI LUN and remove or comment out all references to the SD Card (/dev/mmcblk0p*) and add an entry for your root and boot partitions. Here's an example fstab:
proc /proc proc defaults 0 0 192.168.0.5:/volume1/tftpboot/b8b2337a /boot nfs nfsvers=3,_netdev 0 0 UUID=747d83a1-01e9-480f-aed4-befb97a85e48 / ext4 defaults,_netdev 1 1 #PARTUUID=8f17266b-01 /boot vfat defaults 0 2 #PARTUUID=8f17266b-02 / ext4 defaults,noatime 0 1 # a swapfile is not a swap partition, no line here # use dphys-swapfile swap[on|off] for that(192.168.0.5 should be the IP address of your Synology)
- You RPi should now support network boot. Try rebooting without an SD Card. If you are using a Raspberry Pi 3B, remember that you will need to use an SD Card formatted with a FAT32 partition and a copy of bootcode.bin to resolve hardcoded bugs.
Optional Configuration & Considerations
I recommend you add the following to the bottom of your /boot/config.txt file after network booting:
dtparam=act_led_trigger=heartbeatThe above parameter will make the RPi's internal green LED, which defaults to disk activity, to instead follow a heartbeat pattern when the kernel loads. This is helpful when your system is headless to determine kernel crashes and if your RPi has successfully loaded the kernel on boot.
Also, for those wishing to network boot to create RPi-based Kubernetes Cluster, you may need to load a arm64 kernel to support various containers/components. While loading a 64bit kernel is trivial, remember you will need to generate new initrd image files for that kernel or your iSCSI root volume mount will fail at boot. For best results, enable the 64bit kernel mode on an SD Card-based boot, and generate a new initrd image file using the aforementioned procedure in this guide. Then copy the initrd image file to your tftpboot NFS share into the RPI_Serial_Number directory.
In addition, special care needs to be taken when upgrading the RPi's kernel, as you may need to rebuild your initramfs image files in /boot and update your config.txt (also in /boot) to match your updated kernel version. To rebuild the initramfs image files, use the earlier command reference (located in Final Steps), but modify it to manually force the kernel version that you intend to boot. Remember, these options must be done prior to rebooting after updates or your system may hang on reboot.
Updates for DSM 7.0
I've found that there are certain settings that greatly reduce latency and present no issues to my running configuration:
NFS Configuration
- Enable NFSv4
- On each NFS share permissions screen, Enable asynchronous and Allow users to access mounted subfolders.
- Remove sync and nfsvers=3 from any /etc/fstab NFS-related mount options.
Enable Space Reclamation on RPis
Log in to each RPi that is netbooting off of iSCSI and enable fstrim.timer in systemd. Then either reboot or manually start the service.
Credits & Acknowledgments
This blog came from lots of quality snippets taken from other guides and technical articles, but I wanted to give praise and link back to both the Network boot your Raspberry Pi - Raspberry Pi Documentation, as well as Net boot (PXE + iSCSI) with a RaspberryPi 3 - darknao's stuff
Both guides are some of the best I've seen covering this topic. Hopefully, this guide will synthesize knowledge from both to give a more complete picture and fill in more gaps to the process.
Conclusion
I hope this guide has been helpful to you. Please feel free to leave comments questions and feedback in the comments section below.


