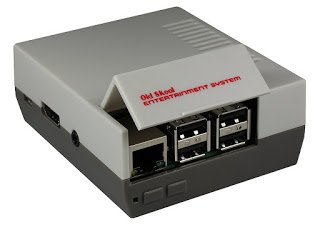
Since the Nintendo Classic Mini was announced on November 2016, I have wanted one to revisit my childhood memories.
Long before my first personal computers, I loved my Atari 7800, Nintendo Entertainment System, and Super Nintendo. As a child, it was an escape into other worlds and the best possible way to escape the social awkwardness of being an INTP. My mother,an INFJ, and I would often spend time together figuring out games, solving puzzles, and on rare occasions calling the video game hint lines for tricks to get us through difficult sections. Life before the Internet and the Information Age was an so different from today. I remember the copious notes that my mother took while we played Shadowgate and other RPGs in order to navigate dungeons and unlock secrets. She used to level up characters for me while I was at school and then rely on my dexterity to defeat the bosses or navigate complicated obstacles. I cherish those memories with her.
You could say that I was a little disappointed when Teri and I tried and failed on multiple occasions to acquire an NES Classic Mini. We were continuously defeated by scalpers, crappy websites, etc. Our final attempt was when BrickSeek indicated that a Walmart 12 miles away from us had three units on 04/28/17.
If anyone ever needs proof that Teri is an ENFJ, it was when she jumped out of my car, 9 months pregnant, and literally ran into a Walmart after a full 10 hours of work to stand by my side for several hours in a nerd herd that was waiting obtain one of these devices.
Seeing her smile while being totally uncomfortable for me caused the wheels in my head to turn. We didn’t have to wait here for this silly collectible emulator. I told her that I wanted to give up and that she needed to get off her feet. She offered endless encouragement at her own expense, but I told her that had a solution:
I’ll build one!
This week I assembled a Raspberry Pi 3 retro arcade emulator. I had read several articles about building and installing a retro console on a Pi, but I had never put any effort behind it largely out of laziness. Now my laziness had been negated by my scorn for Nintendo’s handling of the NES Mini supply crisis. The aforementioned case was picked to memorialize Teri extreme effort in trying to help me find one and for its nostalgic charm.
There are dozens of blogs articles that touch on how to build and assemble a Pi-based emulation system, so I won’t bore you with yet another walk-through; however, I will tell you what I learned from my experience.
My goal was to have fun using my device. I do enough hackish things for a living and during the course of a regular day, so here’s my best-practice advice on the subject:
- Start your research at recalbox.com
- The majority of guides involve setting up RetroPie as your OS. RetroPie and RecalBox are virtually the same tech stacks; however, RecalBox is much easier to setup and configure. It also has a lot more polish and if you plan to share the device with small children and/or non-technical users, RecalBox is the way to go!
- Definitely get the latest Raspberry Pi that is supported by RecalBox
- You need a compatible memory card over 8GB, I used a 32GB SanDisk card.
- At the time of this article, RecalBox does not support the native on-board Pi3 Bluetooth controller, so if you want to use Bluetooth, you’ll need to get a supported usb-based adapter. Again, consult RecalBox’s website.
- If you’re like me and you purchased everything separate, because you wanted to use the aforementioned case, don’t forget to purchase a compatible set of heatsinks and a power supply.
- Also, I’d recommend getting a small wireless keyboard/touchpad combo, as it makes initial configuration and advanced setting manipulation much easier.
- Wireless Controllers are a requirement there are lots of options out there, but I wanted nostalgia, so I purchased 8BitDo SNES controllers. They work exceptionally well.
- Once you have everything setup, you’ll notice that NES games don’t seem to look or perform very well. My fix was to change the emulation core from the default setting to Nestopia. I also changed Shader Set to “Retro”.
Once completed, you’ll find yourself with a high performance device that will make the unobtainable NES Classic Mini a distant and less painful memory.
Discover more from Warmest Robot + Warmest Human
Subscribe to get the latest posts sent to your email.
