Introduction
The first edition of the Raspberry Pi Network Boot Guide, originally dated 2021-06-21, was easily one of my most popular and visited blog articles. Based on comments and feedback from my readers, I’ve completely revamped and superseded the original blog post to include updated screenshots for Synology DSM 7.x, Raspberry Pi OS (Debian 12), more architectural performance optimizations, and instructions for network booting the Raspberry PI 5.
Since 2021, I’ve spent a significant amount of time refining my process for network booting Raspberry Pis on a Synology NAS. It took reading many existing blogs, as well as the official Raspberry Pi network boot guide, and a fair amount of trial, error, and continuous enhancement.
In the end, I’ve figured out the nuances of booting a Pi 3B, Pi 3B+, 4B, and 5 on a combination of NFS and iSCSI. While there are many guides out there on this subject, my goal is to bring all the secret sauce into one article that is comprehensive and optimized for Synology NAS owners with homelabs.
Prerequisites & Disclaimers
This is a reasonably advanced topic. If you are finding yourself getting lost with specific jargon, this may not be a good approach for you yet. While I have attempted to make this article very complete with safe command line and configuration syntax that can be copied into your own environment, you may damage the configuration of your home network, accidentally delete data, or cause ancillary problems (aka collateral damage). I offer no guarantees or support if following this guide does harm or doesn’t yield your desired results. So, follow my practices at your own risk.
Synology references pertain to DSM 7.x. Raspberry Pi OS references pertain to Debian 12 “Bookworm”.
Also, you should be leveraging firewalls on each of your endpoints, and especially on your Synology NAS. The proper configuration of these various host and device firewalls is assumed and is not explicitly covered in this documentation.
TLDR; I want an updated easy button!
Back in February of 2022, I created a setup of scripts to make some of my homelab-related tasks easier, including automating the final steps of my original guide. While, those scripts needed an overhaul with the release of Raspberry Pi OS 12 (Bookworm) because the Raspberry Pi team changed key file locations within the /boot partition and there was legacy carryover for network boot dependencies.
Good News – I’ve released new versions of my scripts to solve this problem on GitLab, as well as updated the original companion article.
You will still need to read enough content here to understand how to prepare your RPis for network boot, as well as your network and storage environments to make use of my nifty aforementioned scripts.
Why network boot a Raspberry Pi?
There are a lot of reasons why someone would want to boot a Raspberry Pi (RPi) with network storage. For one, I have a number of projects that involve leveraging RPis for compute in my homelab. This has numerous advantages over virtual machines or more expensive PC builds. RPis use less electricity, produce less waste heat, are a magnitude smaller than even the some of the smallest form factor PCs. For all of the benefits of the RPis, its weakest link is the use of micro SD memory cards for storage. While SD cards are very affordable and quite compact, they have a limited number of write cycles, and depending on how much you spend there are varying degrees of design quality that make things like wear-leveling and environmental tolerance a bit inconsistent across brands and manufacturers.
By network booting, Pis can offload their storage I/O to a centralized source that has much faster drives without having to consume additional space, power, and complexity to use USB drive enclosures. In addition, when leveraging a NAS, your RPis can take advantage of advanced features like RAID-protected volumes, NVMe cache, snapshots, replication, and cloud backup.
For me, this is critical. I don’t want to spend the time to build rich services in my homelab only to have the effort wiped out due to a failed SD card, human error, or environmental factors. Network booting also allows you the ease of centralizing some of the configuration elements of your RPis in one place. This can save you time if you need to push configuration changes to multiple systems without interacting with them directly.
Why Synology?
If you are like me, you have already invested in a NAS or Network Attached Storage device for your home. My favorite NAS brand is Synology. They are affordable and offer a wide assortment of models, configurations, and features that are stable, consistent, and easy to deploy. When I get time after work, parenting, etc., the last thing I want to do is spend a lot of time wrestling with unneeded complexity when working on my hobbies. Which ironically, are somewhat complex in and of themselves.
Synology solved a lot of those problems for me for almost a decade, and depending on the model you purchase and how you configure the drives, it can become the centerpiece of your homelab / media center too. My preference has been for the ‘Plus’ series models, as they typically have the widest assortment of configurations that allow for external expansion units, as well allowing users to easily upgrade RAM and make simple internal repairs. My current primary model is a DS923+. This model replaced my DS716+ in 2023 and has enabled me to further optimize my homelab setup.
In the case of this guide, any model Synology model should support the basic features required in this guide. If you have a different NAS model from a different manufacturer or you’ve assembled your own, you can probably piece together your requirements by follow the same logic; however, it may not be plug and play.
Which Raspberry Pis models are covered in this guide?
I will cover the nuances of booting the following three models:
- Raspberry Pi 3 Model B
- Raspberry Pi 3 Model B+
- Raspberry Pi 4 Model B
- Raspberry Pi 5
Which OSes will you cover in this guide?
I will exclusively cover using Raspberry Pi OS (Raspbian) that is based on Debian 12 (Bookworm), as it was the latest officially supported OS from the Raspberry Pi Foundation at the time that this article was published.
There were some big changes with Raspberry Pi OS 12 (Thanks to my reader, Jeremy, who pointed this out):
- In previous versions, /boot on SDcards was the location of config.txt and cmdline.txt. With RPi OS 12, most critical files are now located in /boot/firmware. As such, if you followed my older guide, you’ll find that my provided scripts and related instructions have all been updated accordingly.
In general, how do Raspberry Pis network boot?
While there nuances between each RPi model that impact the network boot process, they all more or less follow, or try to follow, the same overall process. I’ve created a diagram that I’ve attached below to illustrate the common process:

Raspberry Pi Boot Process
Preparing the RPi 3B for network boot
There are few things that have to happen with the older RPi 3B to prepare it for network boot, as well as getting it to consistently boot from the network. They are as follows:
- Write a Raspberry Pi OS (Lite) 64-bit image to an SD card and boot the RPi 3B.
- Log in as a user belonging to the sudo group and check if the RPi 3B is configured for set to the correct USB boot mode:
$  vcgencmd otp_dump | grep 17:
17:1020000a- The return value must be 17:3020000a
- If the return value is not 17:3020000a, set the USB boot mode in your OTP memory to the correct value, by adding the following to the bottom of your /boot/config.txt:
program_usb_boot_mode=1- Reboot
- After rebooting, you should be able to verify that the USB boot mode is now properly set by running the vcgencmd from Step 2.
- Once verified, you can remove the line you added in Step 4 from your /boot/config.txt
Now your RPi 3B should be capable of booting off of the network. This can be tested by booting without the SD card. You should notice that the NIC will now initialize without an SD card present.
While it may seem like you are done with prep at this point, there is one critical caveat that effects this particular model. While it is now possible to network boot without the SD card, there are several hardcoded bugs that make this experience inconsistent and problematic on this model. In order to boot consistently off of the network, you will need to format an SD card with FAT32 and copy the bootcode.bin file to it. Next, you will need to place that SD card back into your RPi 3B in order to consistently network boot without errors, hangs, or weird other quirks.
The good news is that this SD card will only be used to read the bootcode.bin file to step around the hardcoded bugs in this particular model that often cause network boot to fail and nothing else. Any SD card that can handle the environment where the the RPi 3B will be installed should be suitable for this task.
The bad news is that there is no way to trust this configuration without still leveraging an SD card. Also, the RPi 3B only supports a 100Mbit NIC, compared to the 3B+,4B, and 5 which support 1Gbit NICs. That said, the 3B is still a great RPi for certain workloads and it will consistently perform well if you can deal with the slower NIC and SD card caveat.
Congrats, this model is now prepared to network boot!
Preparing the RPi 3B+ for network boot
In general, these are fairly easy to configure for network boot, as most of the earlier bugs concerning this platform have been resolved. They are as follows:
- Write a Raspberry Pi OS (Lite) 64-bit image to an SD card and boot the RPi
- Log in as a user belonging to the sudo group and check if the RPi 3B+ is configured for set to the correct USB boot mode:
$  vcgencmd otp_dump | grep 17:
17:1020000a- The return value must be
17:3020000a - If the return value is not 17:3020000a, set the USB boot mode in your OTP memory to the correct value, by adding the following to the bottom of your /boot/config.txt:
program_usb_boot_mode=1- Reboot
- After rebooting, you should be able to verify that the USB boot mode is now properly set by running the vcgencmd from Step 2.
- Once verified, you can remove the line you added in Step 4 from your /boot/config.txt
Unlike the RPi 3B, the 3B+ will consistently boot without an SD card containing bootcode.bin. Congrats, this model is now prepared to network boot!
Preparing the RPi 4B for network boot
In general, these are the easiest to configure for network boot and provide the best visual feedback; however, depending on when it was fabricated you may have to have to update the eeprom code prior to successfully achieving network boot.
- Write a Raspberry Pi OS (Lite) 64-bit image to an SD card and boot the RPi 4B.
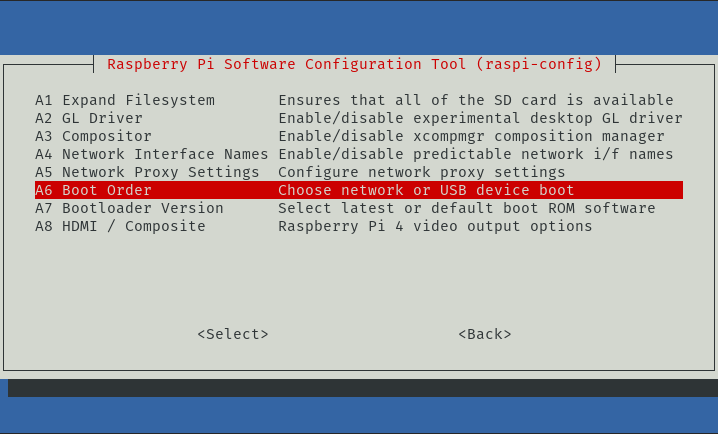
- Log in as a user belonging to the sudo group and use raspi-config to set your RPi 4B to boot from the network if an SD card isn’t present or bootable:
$ sudo raspi-config- Select Advanced Options

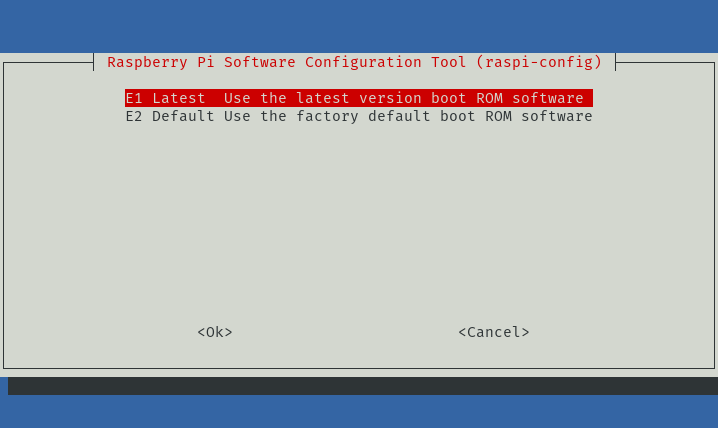
- Select Bootloader Version

- Select Latest and let raspi-config download and write the latest bootloader.
- Return to the Advanced Options from Step #3
- Select Boot Order
- Select Network Boot
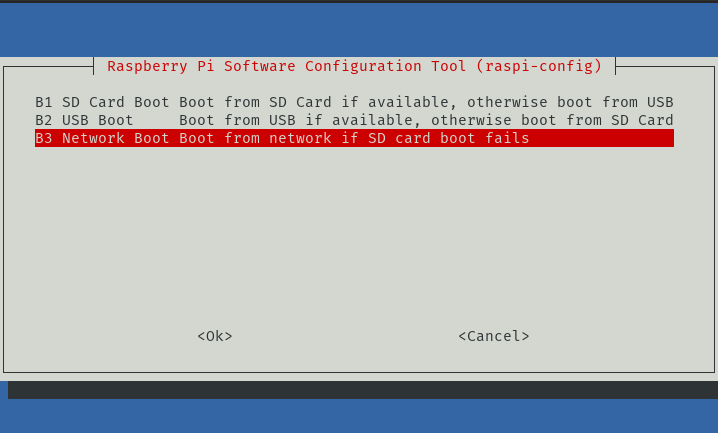
- This will program the RPi 4B to attempt to boot from the network when the SD card is not present.
Unlike the RPi 3B, the 3B+, 4B, and 5 will consistently boot without an SD card containing bootcode.bin. Congrats, this model is now prepared to network boot!
Preparing the RPi 5 for network boot
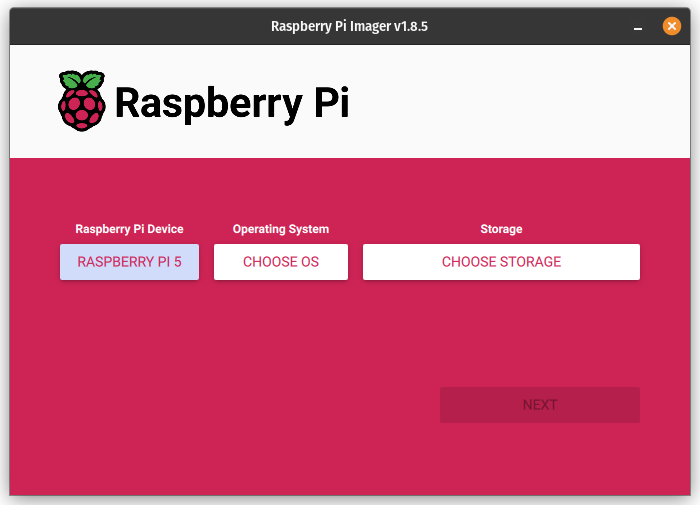
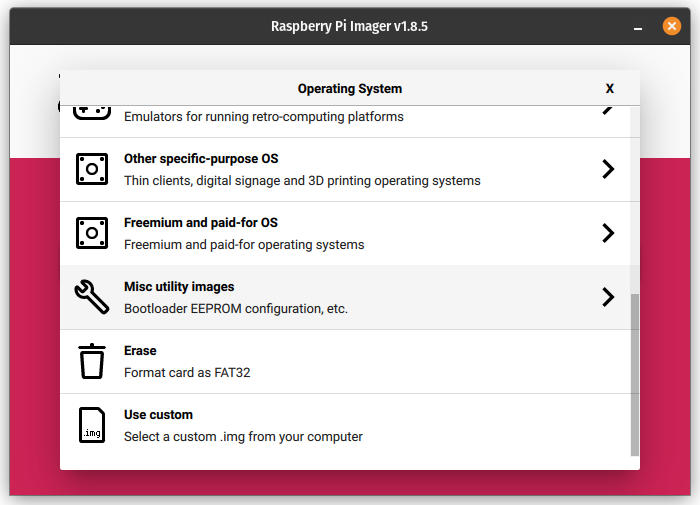
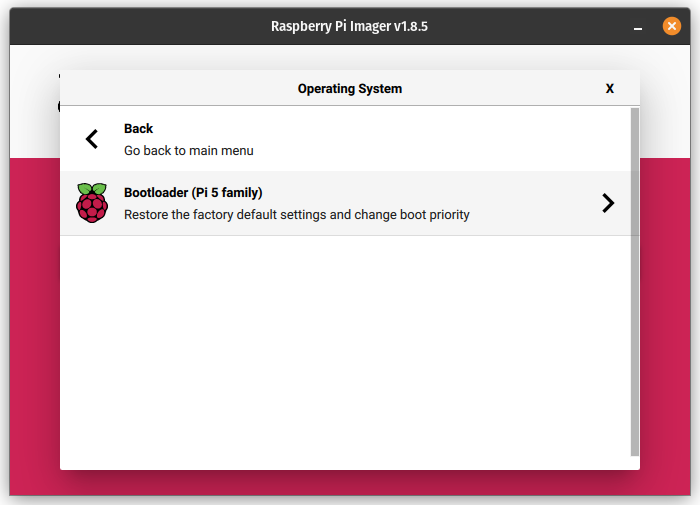
Essentially, the RPi 5 prep is identical experience to the 4B models; however, I wanted to illustrate an alternate method for enabling network boot on both models.
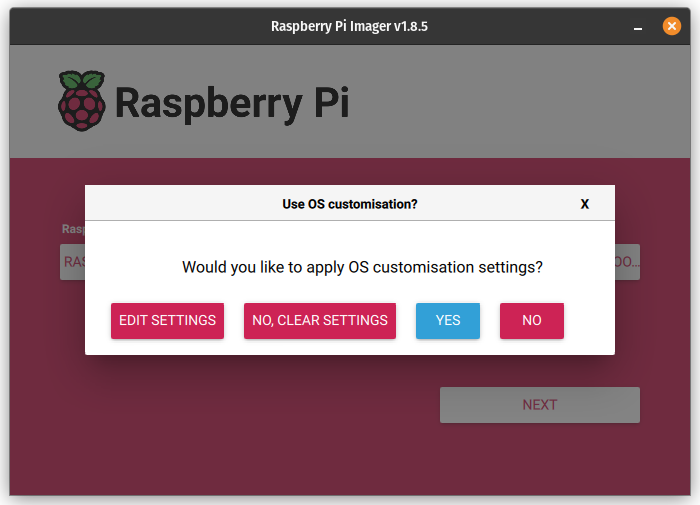
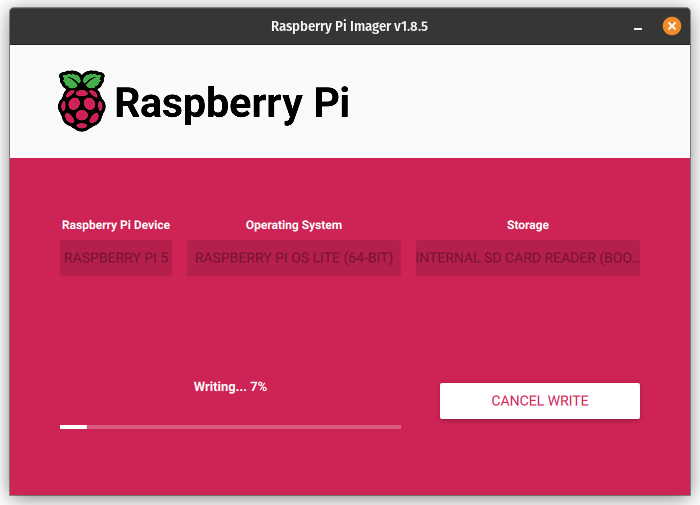
By leveraging the Raspberry Pi Imager, you can create a bootable SD card image that will automatically enable the network booting.
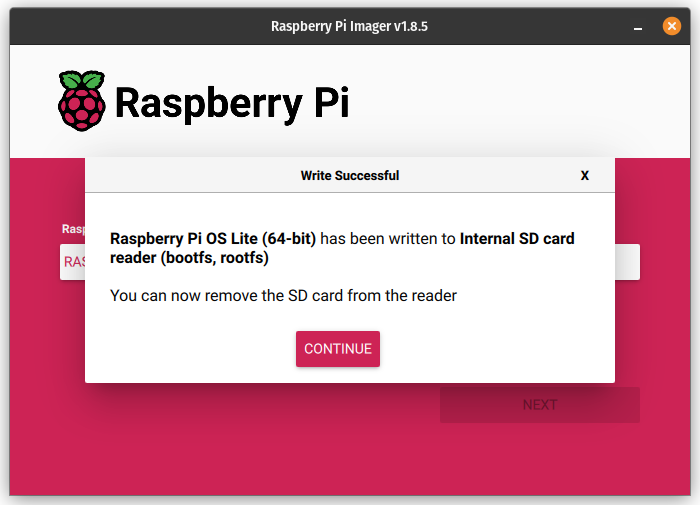
I’ve illustrated the steps for the RPi 5 below with screenshots:
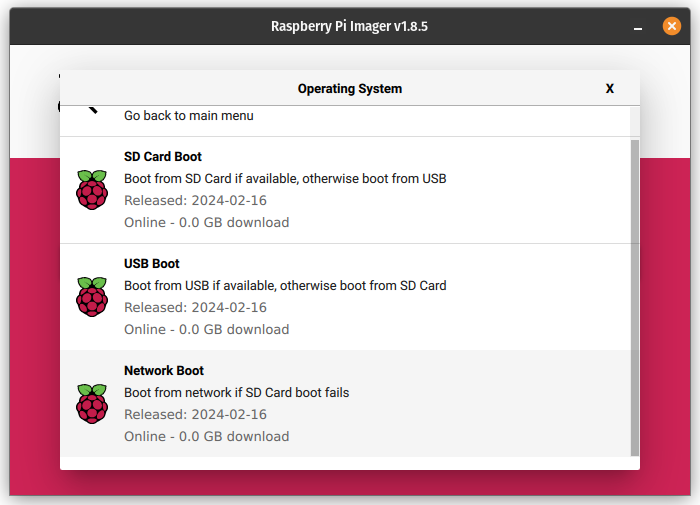
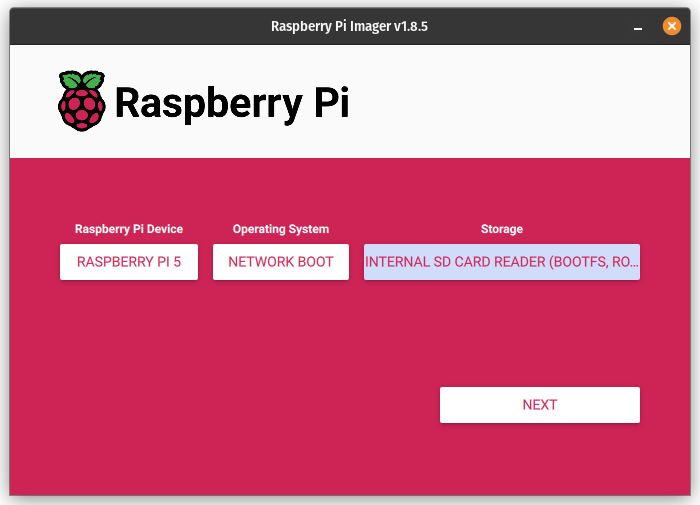
- Once, the SD card has been written, place it in the RPi 5 and boot it. If all goes well, you’ll be presented with a green screen indicating that the network boot mode has been properly set and will take effect on future boot attempts.
- Write a Raspberry Pi OS (Lite) 64-bit image to an SD card and customize it so that there’s less to do on first boot:
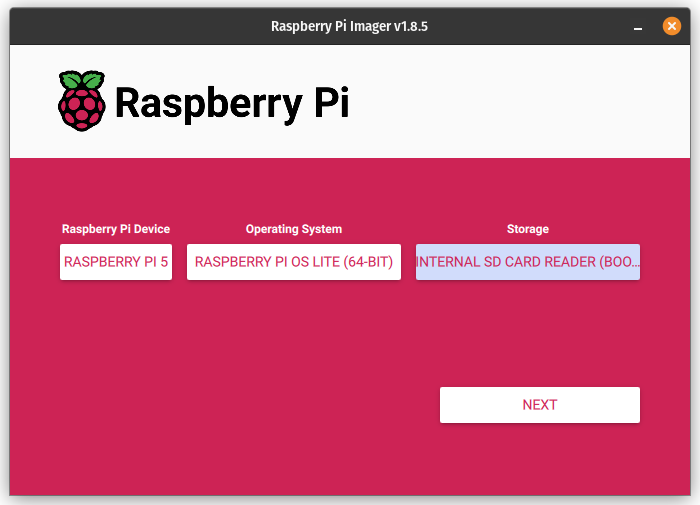

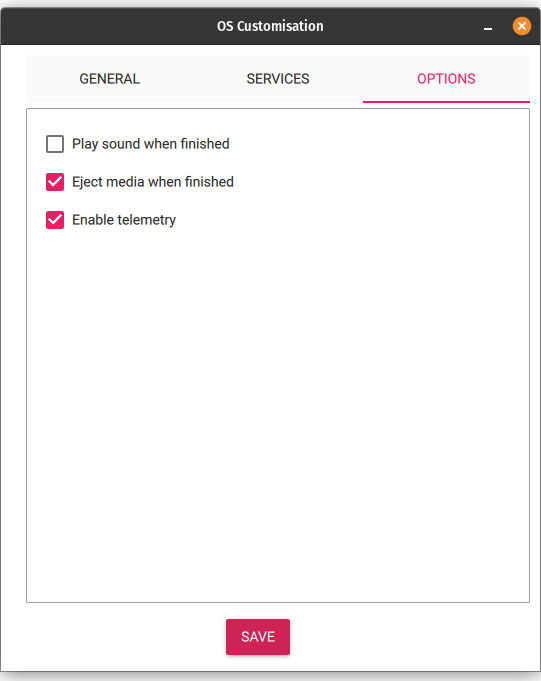
Again, this same procedure can be used for RPi 4B as long as you select the proper hardware profile in the Raspberry PI Imager. This saves the step of having to configure SSH manually.
My RPis are prepped, now what?
Well, that wasn’t too bad, was it? Now it’s time prepare your environment. In the next section, we’ll prepare the local area network, our Synology NAS, and the auxiliary services that actually will facilitate network boot.
Storage Overview
Regardless of your configuration, you will need the following services setup and configured on your NAS:
- NFS File Services
- You will need one share dedicated to host TFTP Boot Files. I call my share tftpboot. It is best if this share is exclusively reserved for use by NFS only.
- You will need to manage specific NFS permissions on this share for each RPi you wish to host, as well as the dnsmasq server if you decide to use one.
- iSCSI Services
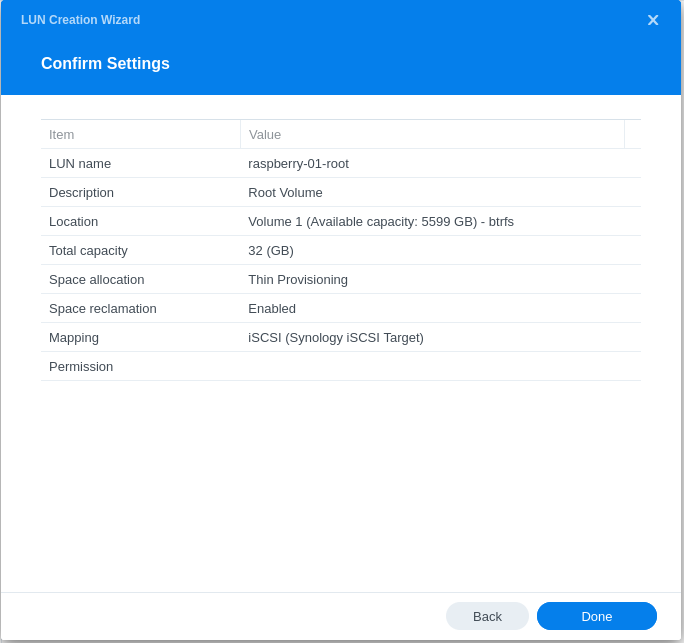
- I recommend that you create a single iSCSI Target and LUN for each RPi you plan to boot. By default the Synology iSCSI SAN Manager will only define a single ISCSI target. By keeping a separate target for each RPi, you will have maximum flexibility and troubleshooting problems will be easier since all of your systems won’t be sharing the same target. Additional LUNs can be added later, but that is beyond the scope of this article.
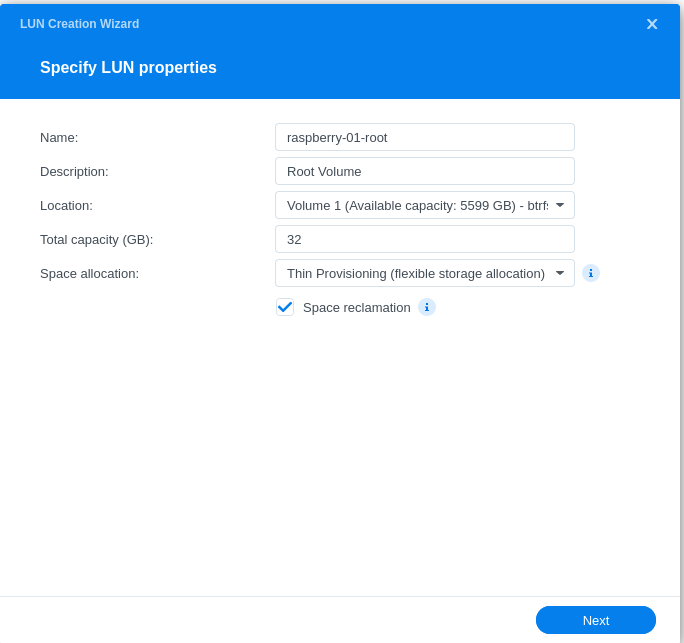
- For the root volume LUN, I recommend at least a 32GB LUN size, as it will be more than adequate for the OS, most basic application and server workloads, logging, etc.
- I make use of thin provisioning and advanced BTRFS features, but some of these features vary between NAS model numbers and your choice here will not impact overall functionality. Also, using thick provisioning and EXT4 will always yield better performance, but I accept the performance hit for all the BTRFS features (snapshots, advanced replication, space reclamation, etc.).
Storage Recommendations
I have had great success running multiple Raspberry Pis off of a pair of mirrored SATA drives (Seagate IronWolf) using Synology Hybrid RAID, as well as many other Synology services.
If you have the physical expansion capacity, as well as extra money in your budget, you may want to consider adding SSD drives, and possibly NVMe drives on newer models, to either host volumes or provide read/write caching.
I have no trouble with this configuration hosted on just plain old SATA drives, but you can get a lot more performance out of your RPis if you’re not fighting with low storage performance capacity. If you plan on running databases or IOPS intensive workloads, you will want to have an SSD dedicated storage tier and possibly some more advanced caching features.
In my case, my legacy DS716+ has a single SSD that hosts MariaDB and a large SATA drive for holding network backups. A cheap mini PC with SSD or NVMe, or a VM hosted on similar storage, will help ensure that your primary NAS isn’t saturated by high I/O applications.
I use Kubernetes in my homelab on clustered RPis. Kubernetes is very IO-intensive, so I use the K3s implementation of Kubernetes from Rancher Labs/SUSE to power my RPi-based cluster.
K3s allows the role of etcd to be offloaded to a external database. This works perfect for me, as it keeps all of the cluster-critical IO on SSD, while using the Synology for caching container images and logging. It’s also pretty helpful for other more common use cases, since the database services are typically where the bulk of IO occurs.
Since purchasing the DS923+, I now have read/write caching enabled on my primary volume via 2 x NVMe drives to offload I/O from my Seagate Ironwolf SATA drives. This has dramatically improved performance; however, I’ve still opted to keep the K3s database hosted on the DS716+ on SSD.
Whatever your particular need is, the more RPIs you setup for network boot, the more potentially performance issues you will have if you aren’t properly planning for IOPS saturation and latency introduced by traditional near-line SATA drives.
These performance issues can be mitigated with the following strategies:
- Do not use traditional swap volumes on the RPis
- Leverage zram for swap space
- Configure your workloads to keep as much as possible running in memory to reduce I/O activity.
- Use read/write cache pool options on your Synology (preferably models with NVMe)
- Use a cheap PC, VM, or an older Synology with SSD or NVMe to offload workloads generating constant write operations or bursty random I/O patterns.
Synology Storage Configuration
NFS Configuration
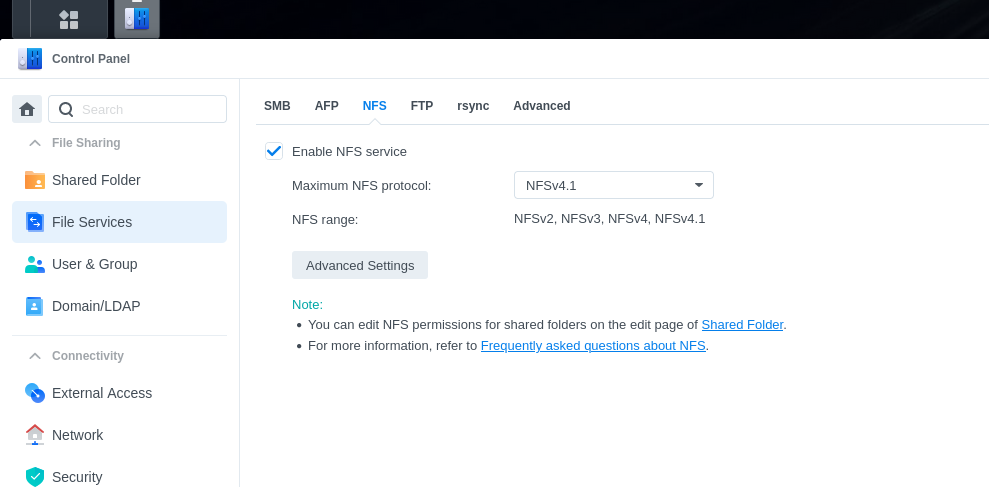
- Enable NFS Service and set NFS maximum protocol version to highest 4.x setting available (varies between Synology models):
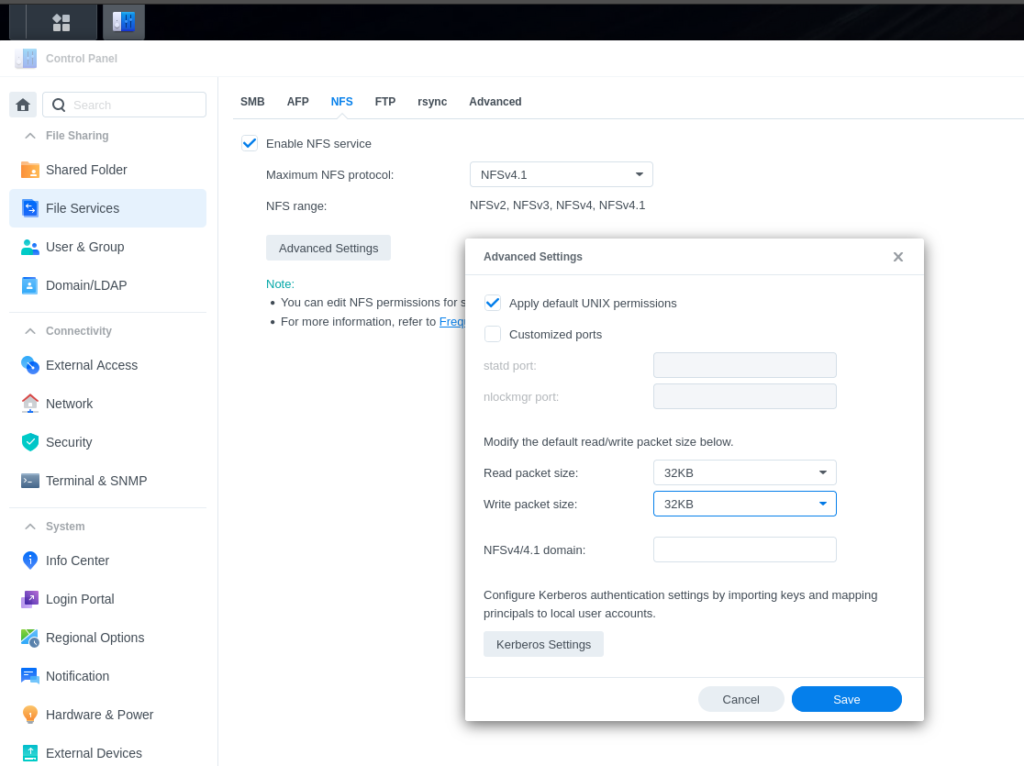
- Click advanced settings and apply default UNIX permissions and set read and write packet size to 32KB and then click save.
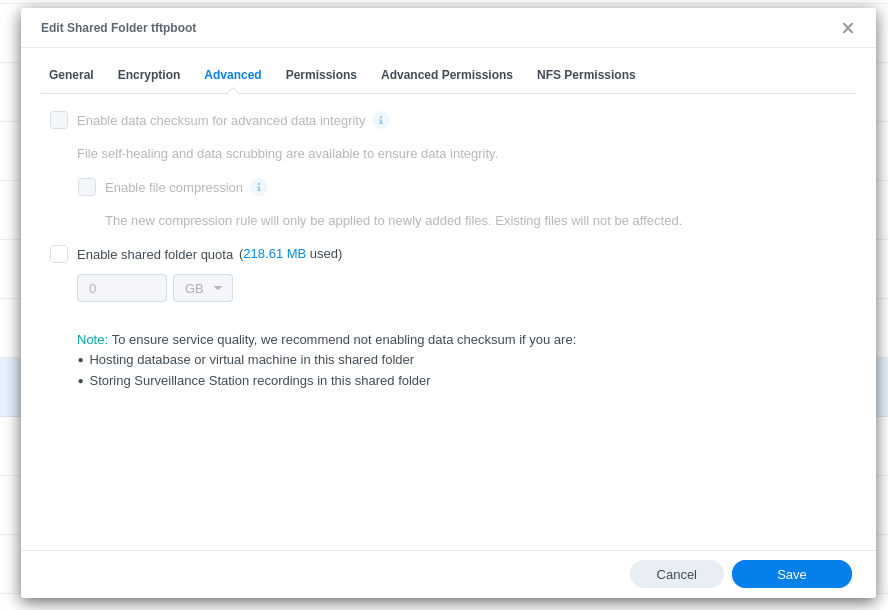
- Create a share called tftpboot. (I do not use data checksum for advanced data integrity, compression, or encryption for this share.)
- Edit the settings on the share:
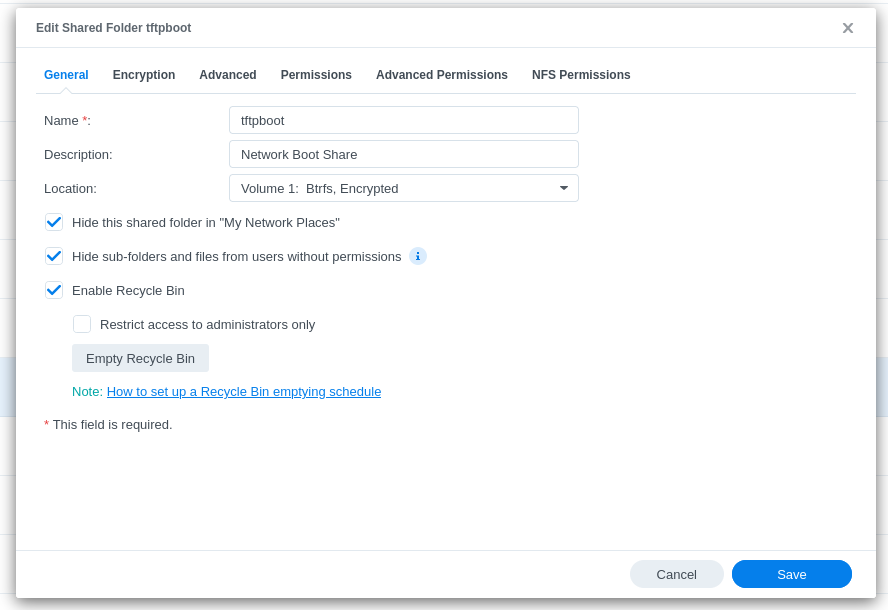
- Leave the Permissions/Advanced Permissions on their default settings.
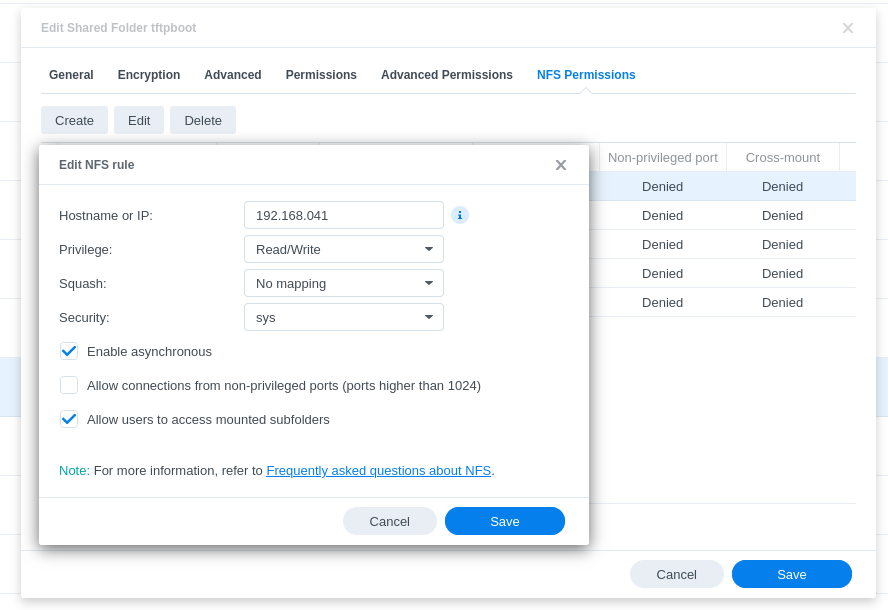
- In the NFS Permissions, add the following entry for your dnsmasq server. (You will configured this in the next section; however it is safe to use the IP address or hostname that you have reserved for this server):
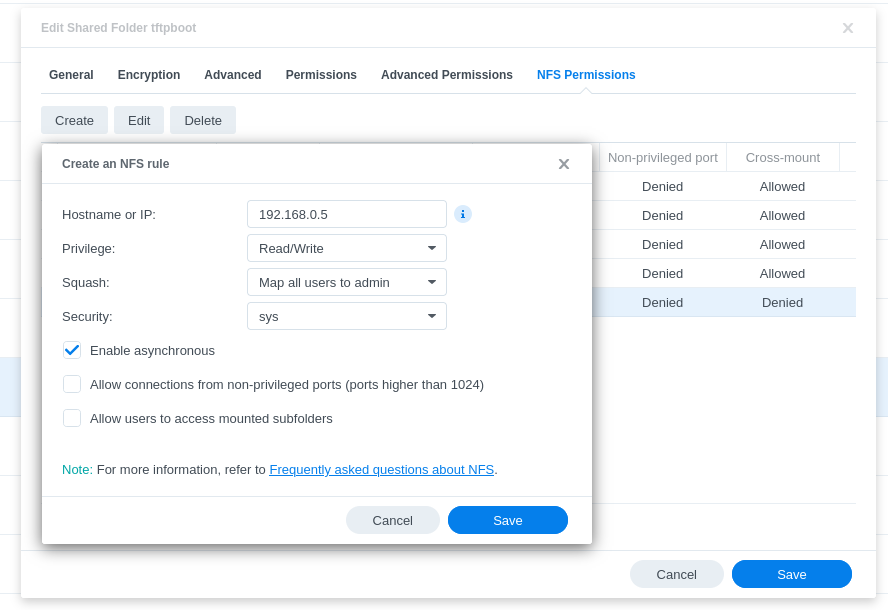
- Also in the NFS Permission, add an entry for each RPi that you wish to boot off the network:
Next, you may need to verify that the correct UNIX file permissions and ownership on the directory structure. I’ve found the easiest way to do this is to ssh into the Synology directly by enabling SSH via the Terminal & SNMP menu in the control panel.
- Once you SSH into the Synology with an admin-level user account, elevate to root:
$ sudo -i- As root, change directories to the volume that is holds the tftpboot share (example: Volume 1):
cd /volume1- Ensure that the root user and group own the shared folder. If not, reset the default UNIX permissions:
Verify Permissions:
# ls -l | grep tftpbootThis is how it should look aside from the date and time stamp:
drwxr-xr-x 1 root root 28 Feb 5 12:42 tftpbootIf the permissions don’t match, reset the permissions:
# chown root:root tftpboot
# chmod -R 0755 tftpboot- Stop working on NFS for now. Now it is time to configure the necessary iSCSI components.
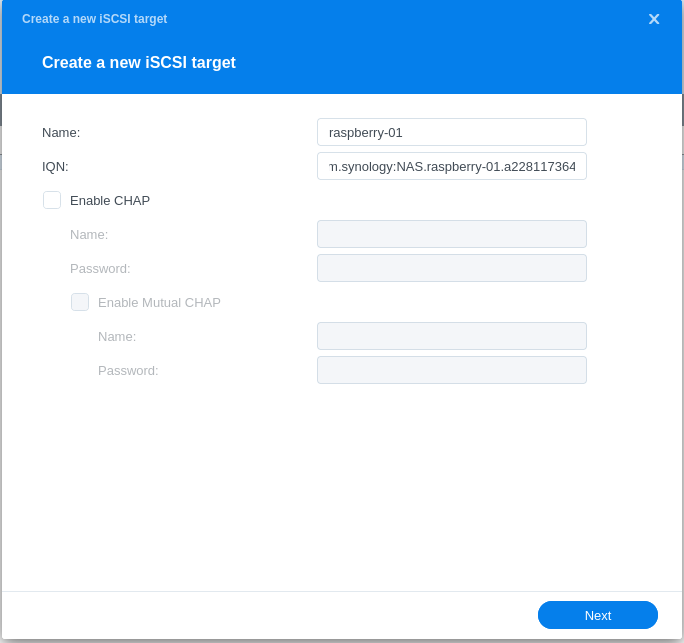
iSCSI Configuration For performance and to reduce overhead, I do not recommend setting up CHAP authentication and CRC checksums. These features are overkill for most home environments and will degrade performance and add additional complexity.
Some blogs recommend enabling “multiple sessions”. This setting is not correct and this setting should remain disabled.
Here’s Synology’s official documentation:
Multiple Sessions: Allow multiple sessions from more than one initiator to connect to the same target at the same time. To protect your files from corruption or unexpected data loss, it is strongly suggested that you use a shared file system or cluster system such as VMware Virtual Machine File System (VMFS) and Oracle Cluster File System (OCFS).
Also, while this guide recommends thin provisioned LUNs with all advanced features enabled for flexibility, these advanced options are not required to support network booting and may not be available on your specific NAS model, or may be unavailable based on how you have configured your disk groups, volumes or file systems. Thick provisioning will result in higher performance and lower fragmentation, but it will immediately consume capacity equal to the maximum capacity of the LUN. Thin provisioning will only consume space as you use and consume it. The advanced features available with thin provisioning will allow you to potentially reclaim unused space back to the supporting volume, as well as leverage snapshots for additional recovery options.
Each RPi will have it’s own unique iSCSI Target and host entry with permissions that can supports multiple LUNs for the easiest troubleshooting and greatest flexibility. While this setup will support multiple LUNs per host, we will only be adding a single LUN (root volume) required to boot.
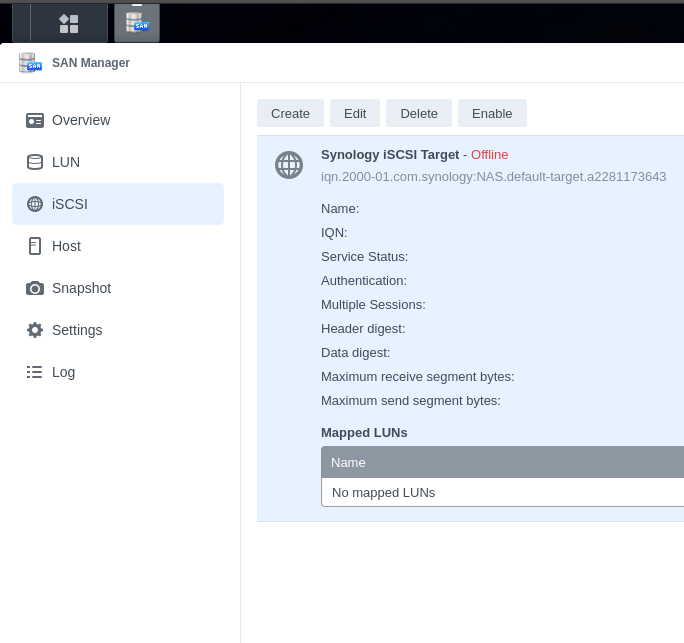
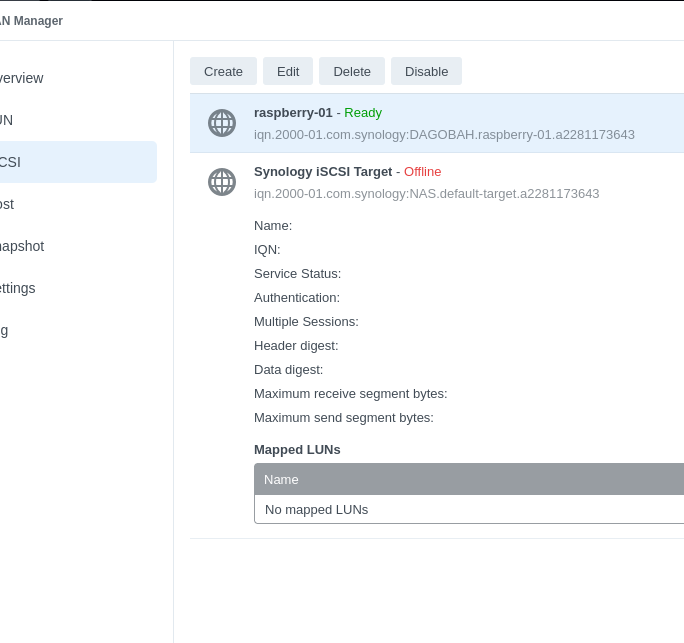
- Disable the Synology-provided Default Target (unless you are already using it)
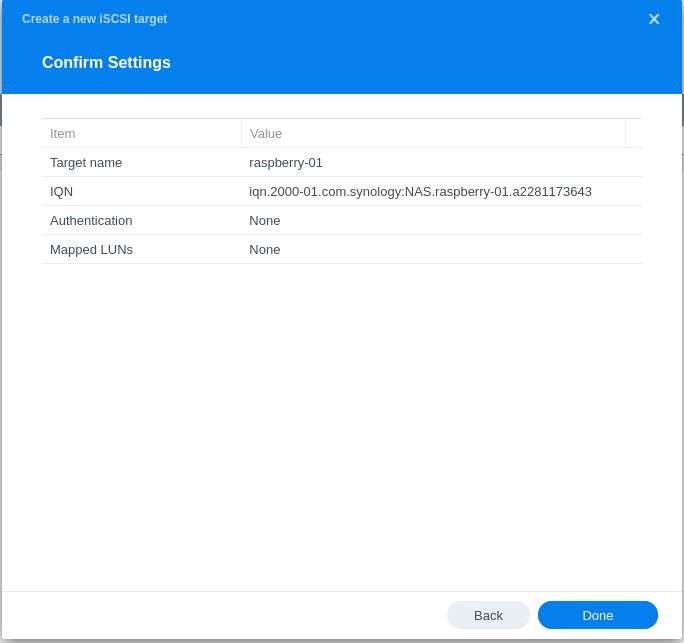
- Add iSCSI targets
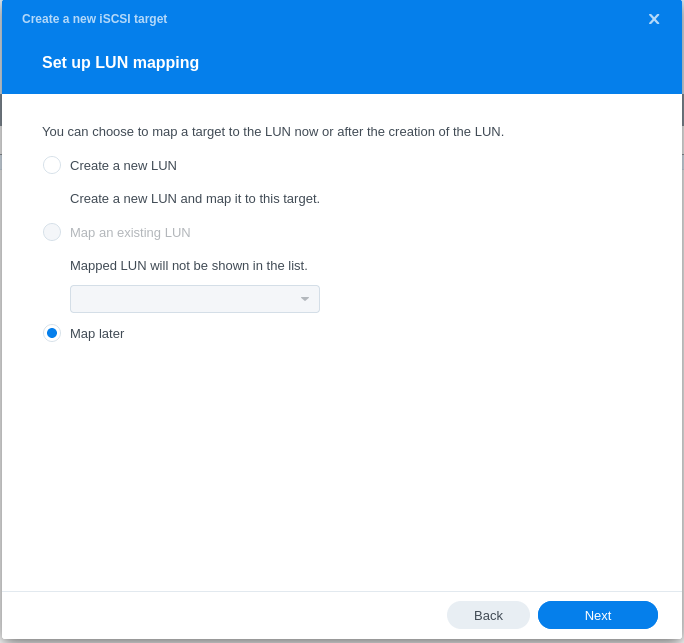
- Configuring LUN & Map LUN to Existing Target
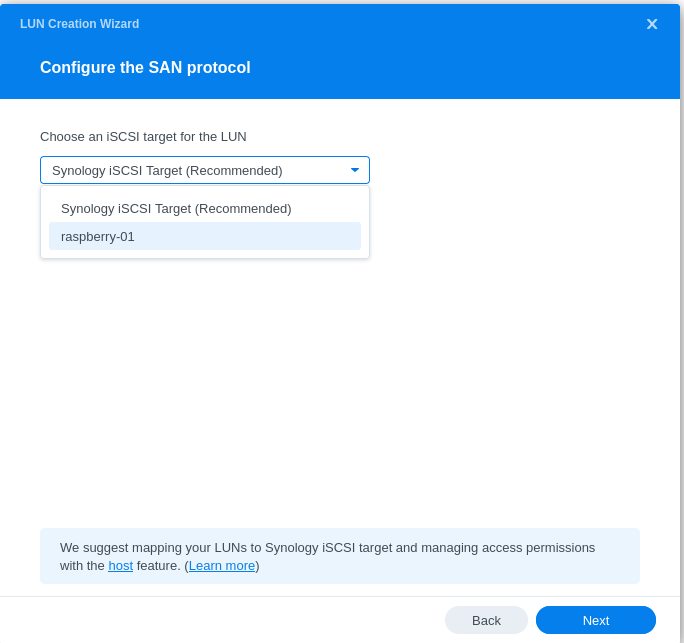
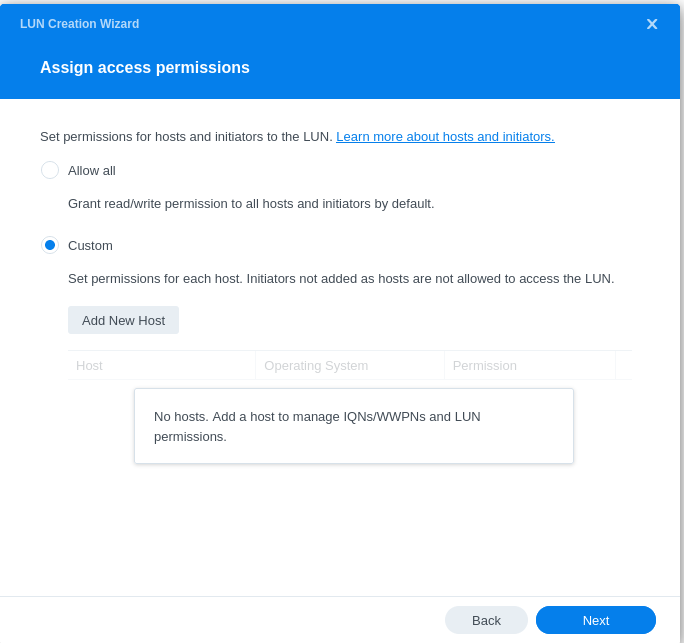
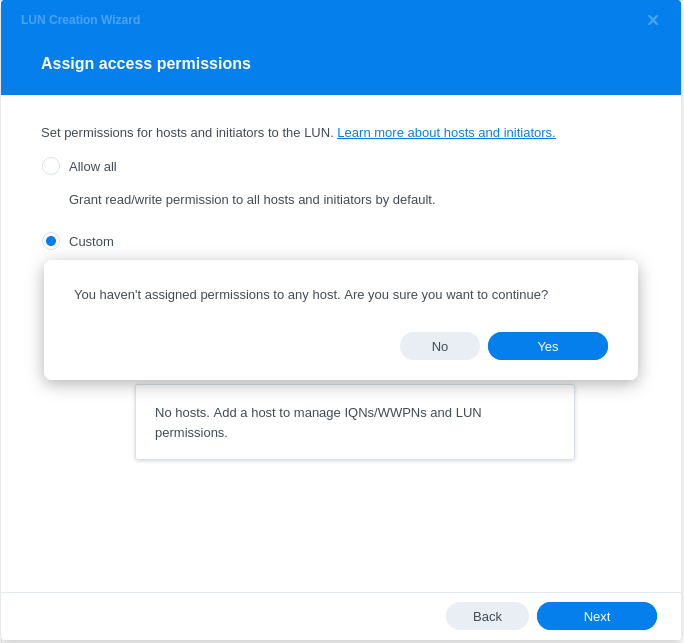
- Review iSCSI target settings and ensure that the default mask is set to no access:
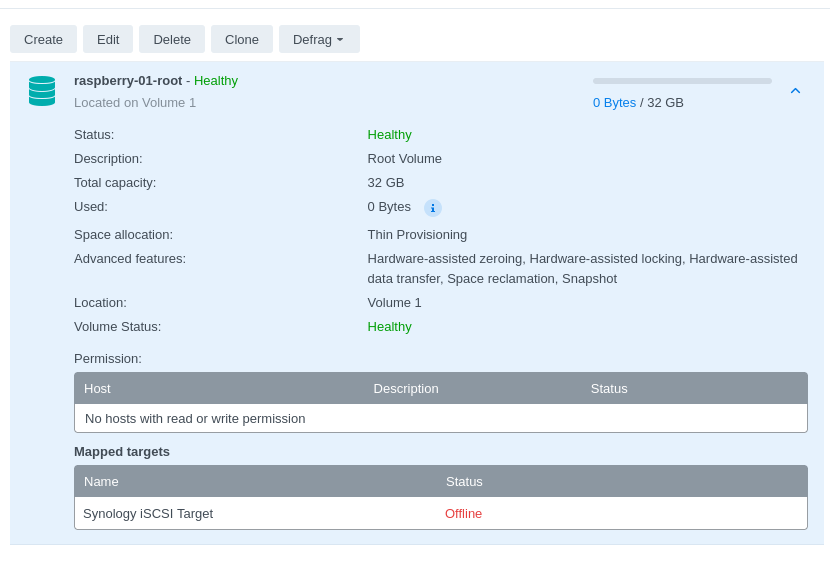
Repeat these steps for each RPi, assigning a unique iSCSI Target Name, IQN, and LUN to each RPi that you wish to setup.
We will revisit the iSCSI Manager in a later step to finalize the masking configuration in order allow the RPi to connect to the target with the unique initiator provided by the Raspberry Pi OS. While you can complete the masking step by specifying your own unique initiator name in advance, I tend to use the Open-iSCSI provided default initiator name, as it is unique and obscure enough for home use to prevent name collisions that can easily happen with less complicated names while iterating changes.
Network Preparation
It has been my experience, that Raspberry Pis, especially pre-4B models are a little kludgy in how they implement network boot and its Ethernet-based NIC. Therefore, I’m here to share a few basic tips to aid in your success:
- Any switch will work; however you may find an unmanaged basic Ethernet switch the easiest to configure.
- Most home networks make use of DHCP to ease with network configuration. The DHCP on home networks is generally provided by the Internet router. Some of these routers lack the advanced configuration of the DHCP service which is required by the RPis for network boot. That’s ok! Here’s what I now recommend for the most consistent results:
- Leverage a VM or computer on your network capable of hosting a dnsmasq server which can proxy additional information required for network booting RPis in combination with your existing DHCP services.
- Make use of DHCP IP reservations for consistency of configuration. While it is possible to not use reservations, it makes the storage preparation and maintenance easier.
This guide previously provided multiple options for dealing with DHCP. After years of refining the configuration, I now only recommend one specific approach:
Configure a dnsmasq server
dnsmasq is an incredibly powerful service that we will leverage to do the following:
- Proxy additional information to clients that compliments the existing DHCP server configuration info on your network. This will eliminate the need to modify existing DHCP services and it always works.
- We will also host TFTP/PXE services from this system that will front-end the Synology NAS-based TFTP Boot File over NFS.
On the VM or physical computer of your choice, install a Linux distribution of your choice. A wired system will most likely yield the best performance and lowest boot times. Currently, I host this as a Synology-based VM directly on my DS-923+, but you don’t need a lot of resources for this. I have also previously leveraged a RPi Zero W for this with great success.
Once selected, please follow these steps:
- Install Linux
- As root, create a mount point for the TFTP Boot Files hosted on the Synology. (ex: /mnt/tftpboot)
- Add a persistent NFS mount to /etc/fstab to your Synology. Here’s an example where 192.168.0.25 is the IP address of the Synology:
192.168.0.25:/volume1/tftpboot /mnt/tftpboot nfs4 defaults,nfsvers=4,_netdev 0 0
- Using your distribution’s package manager, install dnsmasq.
- Locate your dnsmasq.conf and replace it (as root) with the following and modify the dhcp-range value to match the broadcast address of your home network:
port=0

# dhcp-range's IP address should be set to the broadcast address of your existing home network.

dhcp-range=192.168.0.255,proxy log-dhcp enable-tftp tftp-root=/mnt/tftpboot pxe-service=0,"Raspberry Pi Boot"

# Delays sending DHCPOFFER and proxydhcp replies for at least the specified number of seconds.

dhcp-mac=set:raspberry_pi,B8:27:EB:_:_:* dhcp-reply-delay=tag:raspberry_pi,2- Next, stop and restart dnsmasq:
$ sudo systemctl stop dnsmasq $ sudo systemctl start dnsmasq
- Your dnsmasq server is ready to go.
Final Steps
Finally, we will boot our RPi again normally off of the SD card with a clean Raspberry PI OS Lite image and then transfer boot and operating system files to the Synology. I would recommend configuring each RPi individually, as well as attaching each RPI to a display to assist with troubleshooting until you confirm that everything is working. Here are our final configuration steps:
- If you have have only been dealing with one RPi, then feel free to reuse the SD card from earlier; however, if you have been recycling the same SD for preparing multiple RPis, then wipe and re-image the card again. **You will need to wipe and rewrite the Raspberry Pi OS Lite image after completion of this procedure, or manually regenerate various encryption keys (ex: ssh) which are generated on first boot.
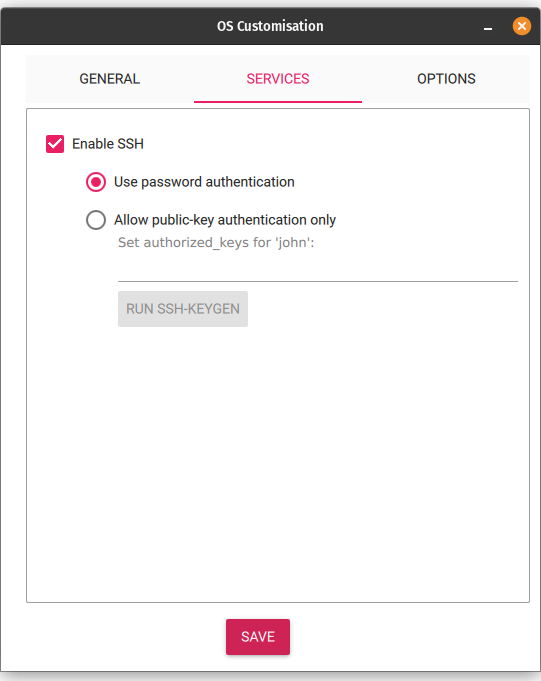
- On the SD card, go into the boot folder and create a blank file called ssh or ssh.txt. This file triggers the RPi to automatically accept SSH-based connections on boot. This will save you from having to attach a keyboard, and can ease setup; however, if you’ve used the Raspberry Pi Imager, this can be toggled on before imaging your SD card.
- Set a DHCP Reservation for the PI and take note of the IP address.
- Boot RPi off of a clean Raspberry PI OS Lite image and verify connectivity, by connecting via SSH to the device.
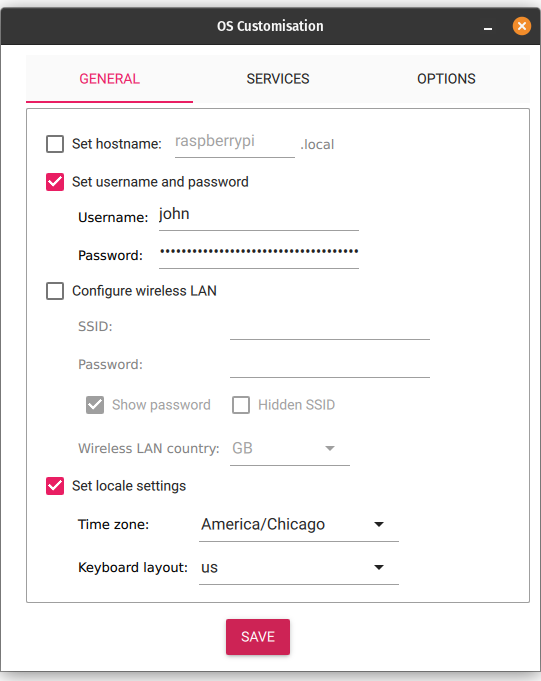
- Use raspi-config to configure your hostname, locale, time zone, keyboard layout, and WIFI country. (Note: To configure local keyboard layout, you will have to have a keyboard attached. If your are leveraging SSH, you can skip the keyboard layout for now.)
- Reboot
- Next, lets update our apt package lists and dependencies from our repositories and then update all packages, kernel, etc to latest stable version:
$ sudo apt-get update
$ sudo apt-get full-upgrade- Reboot
STOP – Decision Point
Now is the perfect time to consider leveraging my script to automate some very manually steps. The script will eliminate most of the manual effort required in steps 9-35. If you decide to leverage the steps, you will still need to complete the required NAS configuration in steps 11 – 15. Please click here to access my GitLab project containing the required script. You’ll want to make sure you download v1.1.x for compatibility.
- Install open-iscsi:
$ sudo apt-get install open-iscsi- Determine the default generated initiator name:
$ sudo cat /etc/iscsi/initiatorname.iscsi

## DO NOT EDIT OR REMOVE THIS FILE!
## If you remove this file, the iSCSI daemon will not start.
## If you change the InitiatorName, existing access control lists
## may reject this initiator. The InitiatorName must be unique
## for each iSCSI initiator. Do NOT duplicate iSCSI InitiatorNames.

InitiatorName=iqn.1993-08.org.debian:01:a17ea0b81be9
(ex: Initiator name above is iqn.1993-08.org.debian:01:a17ea0b81be9)
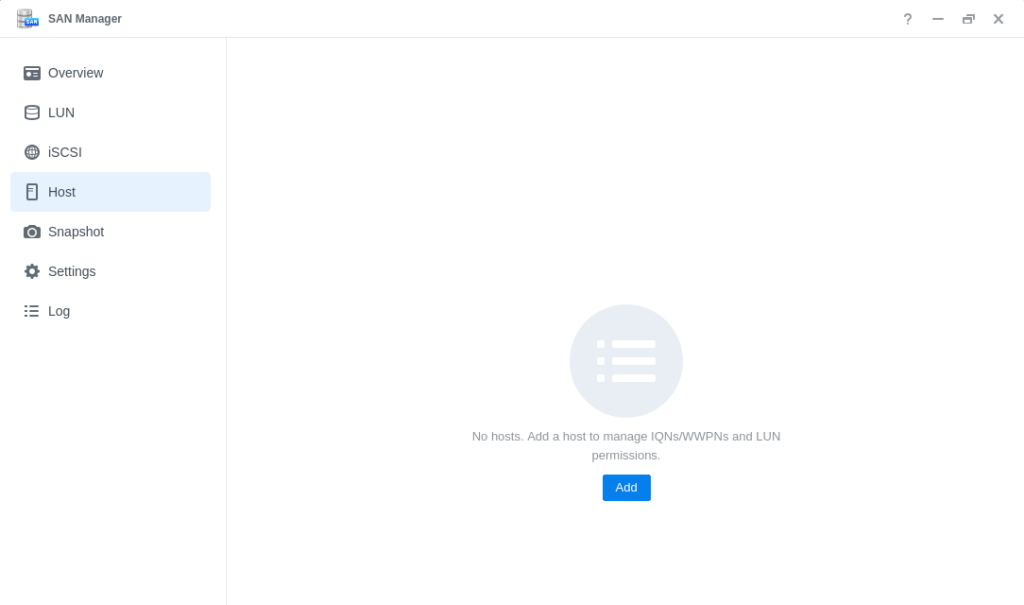
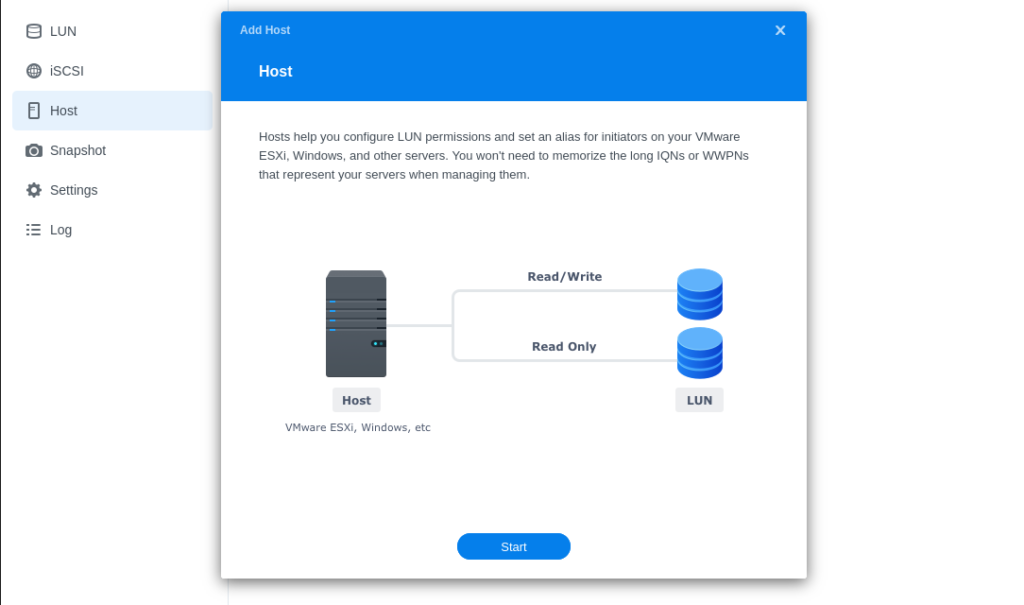
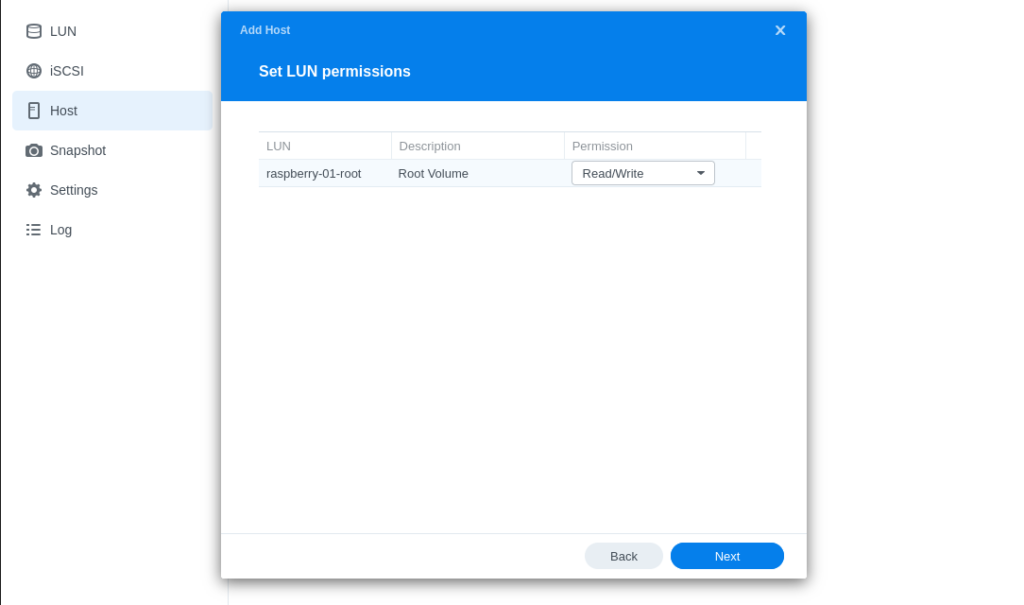
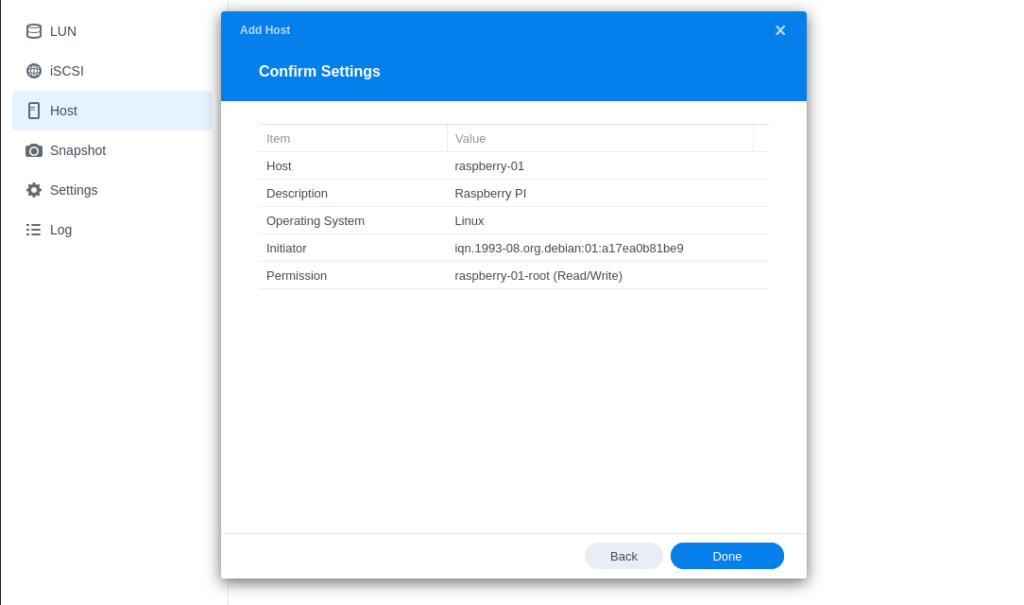
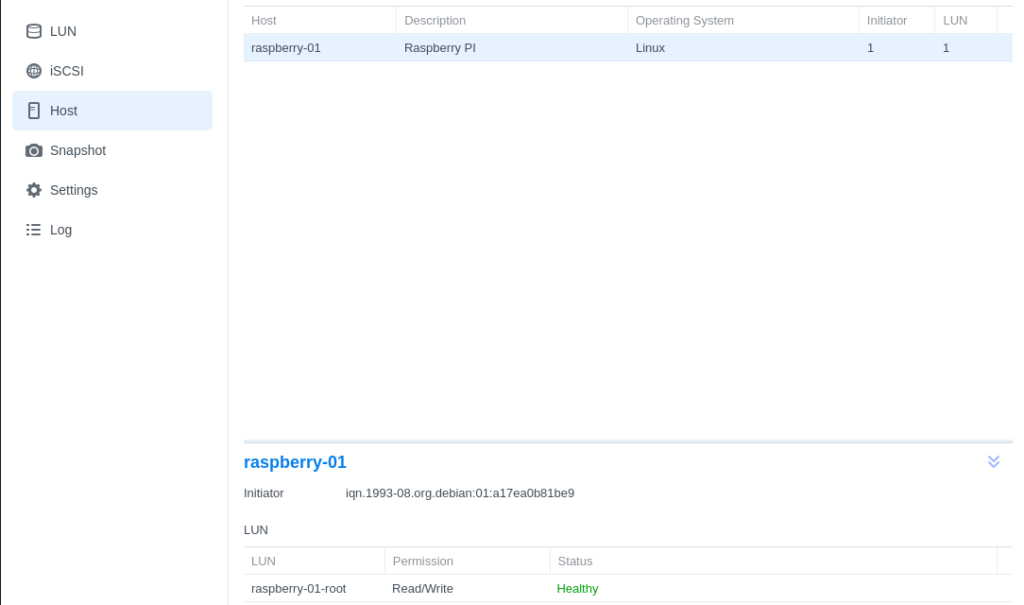
- Finalize your Synology’s iSCSI configuration by returning to iSCSI Manager in DSM and adding a host entry for your RPi by inserting your initiator name:
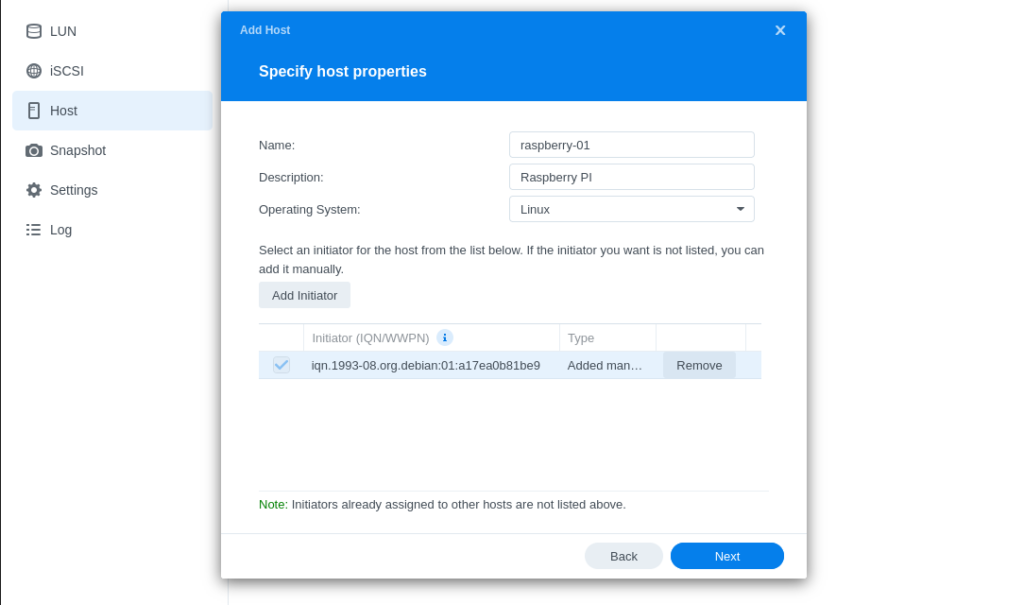
- Set LUN Permission as Read/Write mask under the corresponding iSCSI target in the next step:
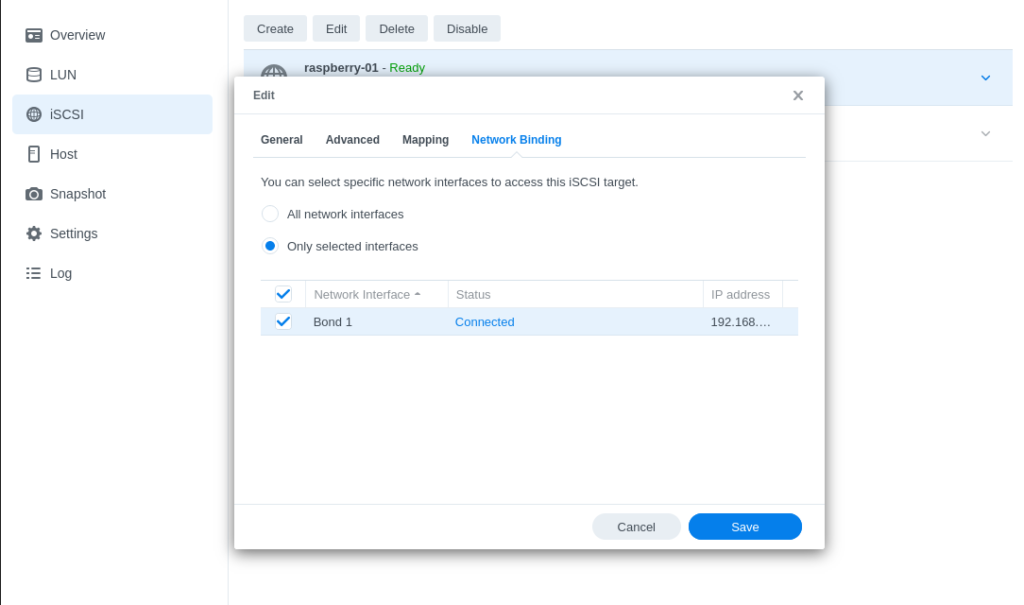
- Next, review the Network Binding sub-section of the previously created iSCSI target. By default, all network interfaces will be selected, but in many cases most home users will probably be only using a single interface with their Synology. If that is the case, select the appropriate entry:

- Take note of your iSCSI Target IQN (ex: copy it to your clipboard and paste it someone for reference).
- Save your iSCSI Manager Settings and return to your RPi SSH session.
- Discover your iSCSI Targets:
$ sudo iscsiadm -m discovery -t sendtargets -p
<ip_of_your_synology_iscsi_binding></ip_of_your_synology_iscsi_binding>- The output of the previous command will vary depending on how many iSCSI Targets you have configured. Next, logon to your iSCSI Target:
$ sudo iscsiadm -m node -l -T
<target_iqn> -p <ip_of_your_synology_iscsi_binding></ip_of_your_synology_iscsi_binding></target_iqn>- Check your /var/log/messages to see if you’ve successfully logged into your iSCSI Target. Your disk will most likely will be named /dev/sda.
- The iSCSI kernel drivers are not included with the default Raspberry Pi OS Kernel. As a result, you will need to create an initrd image that includes the missing components. First, inform initramfs to include the iSCSI module by creating the following file:
$ sudo touch /etc/iscsi/iscsi.initramfs- Next, create the new initramfs image for your current kernel:
$ sudo update-initramfs -v -k `uname -r` -c- Now take note of your initrd image filename by using the following command, as we will use soon:
$ ls -lrt /boot/init* -rw-r--r-- 1 root root 11095415 Mar 24 16:12 /boot/initrd.img-6.6.20+rpt-rpi-2712Make sure to pick the correct file, as there may be multiple choices. It should match the output from $ uname -r.
- Next, take note of your RPi’s 8 character serial number (the preceding zeros can be omitted) with the following command, as we will use it soon:
$ grep Serial /proc/cpuinfo- Next, we will temporarily mount the tftpboot share on the RPi by using the following command (assuming that your tftpboot share is on volume1):
$ sudo mount -t nfs4 -o defaults
<ip_of_your_synology>:/volume1/tftpboot /mnt</ip_of_your_synology>- After mounting the root of the tftpboot share, our next step is to copy the universal RPi bootcode.bin to the root of the tftpboot share. bootcode.bin is used by most RPi models and should be in the root of this share for legacy compatibility:
$ sudo cp /boot/bootcode.bin /mnt- Next recalling your notes, create a folder that matches the serial number (8 characters) without the preceding zeroes of the RPi:
$ sudo mkdir /mnt/<rpi_serial>- Clone /boot/firmware from your boot partition to the folder that was created in the preceding step:
$ sudo rsync -avhP /boot/ /mnt/<rpi_serial>- Once the clone is complete, edit /mnt/RPI_Serial/config.txt and include the following line at the end of the file:
initramfs <initrd_image_filename> followkernelExample:
initramfs initrd.img-6.6.20+rpt-rpi-2712 followkernel- Next, we need to format and write a filesystem to our iSCSI LUN (the following command assumes /dev/sda as the root volume ):
$ sudo mkfs.ext4 /dev/sda- Now, retrieve and take note of your iSCSI LUN’s UUID. We will use this shortly to configure additional parameters:
$ sudo blkid /dev/sda- Next, we must configure the kernel cmdline required to boot the root volume off of the iSCSI LUN. Edit /mnt/RPI_Serial/cmdline.txt and delete or comment out the first line, while adding the following, while modifying the specifics to settings from notes. These parameters must exist on a single line:
ip=::::<hostname>:eth0:dhcp
 root=UUID=<iscsi_lun_uuid>
 ISCSI_INITIATOR=<rpi_initiator_iqn>
 ISCSI_TARGET_NAME=<iscsi_target_iqn>
 ISCSI_TARGET_IP=<ip_of_your_synology_iscsi_binding>
 ISCSI_TARGET_PORT=3260
 rw
Example of a complete file (where the preexisting line was deleted):
dwc_otg.lpm_enable=0 console=serial0,115200 console=tty1 ip=::::raspberry-01:eth0:dhcp root=UUID=747d83a1-01e9-480faed4befb97a85e48 rootfstype=ext4 elevator=deadline fsck.repair=yes rootwait ISCSI_INITIATOR=iqn.1993-08.org.debian:01:a17ea0b81be9 ISCSI_TARGET_NAME=iqn.2000-01.com.synology:NAS.raspberry-01.2fdf1b5df ISCSI_TARGET_IP=192.168.0.5 ISCSI_TARGET_PORT=3260 rw- Configuration of the tftpboot share is completed. Now we need to complete the configuration of our iSCSI LUN which will function as our root volume. Unmount the NFS share currently mounted on /mnt and mount the iSCSI LUN:
$ sudo umount /mnt $ sudo mount -t ext4 -o defaults /dev/sda /mnt- Clone the OS from SD card to your iSCSI LUN excluding special directories and then recreate the special directories as blank directories:
Clone
$ sudo rsync -avhP --exclude /boot --exclude /proc --exclude /sys --exclude /dev --exclude /mnt / /mnt/Recreate Special Directories
$ sudo mkdir /mnt/- Next, you will need to delete some legacy unused reference files in /mnt/RPI_Serial. Then create symbolic links to items within the /mnt/RPI_Serial/firmware directory as a workaround, as the new file locations are not compatible with the expected locations required during network boot:
Remove 3 Files to prevent symbolic link conflicts
$ sudo rm /mnt/RPI_Serial/issue.txt
$ sudo rm /mnt/RPI_Serial/config.txt
$ sudo rm /mnt/RPI_Serial/cmdline.txt- Finally, you’ll need to modify the fstab file on your iSCSI LUN and remove or comment out all references to the SD card (/dev/mmcblk0p*) and add an entry for your root and boot partitions. Here’s an example fstab:
proc /proc proc defaults 0 0 192.168.0.25:/volume1/tftpboot/b8b2337a /boot nfs4 defaults,nfsvers=4,_netdev 0 0 UUID=747d83a1-01e9-480f-aed4-befb97a85e48 / ext4 defaults,_netdev 1 1 #PARTUUID=8f17266b-01 /boot vfat defaults 0 2 #PARTUUID=8f17266b-02 / ext4 defaults,noatime 0 1

# a swapfile is not a swap partition, no line here
# use dphys-swapfile swap[on|off] for that(192.168.0.25 should be replaced with the IP address or resolvable hostname of your Synology NAS)
- You RPi should now support network boot. Try rebooting without an SD card. If you are using a Raspberry Pi 3B, remember that you will need to use an SD card formatted with a FAT32 partition and a copy of bootcode.bin to resolve hardcoded bugs.
Optional Configuration & Considerations
LED Configuration
I recommend you add the following to the bottom of your /boot/config.txt file after network booting:
dtparam=act_led_trigger=heartbeatThe above parameter will make the RPi’s internal green LED, which defaults to disk activity, to instead follow a heartbeat pattern when the kernel loads. This is helpful when your system is headless to determine kernel crashes and if your RPi has successfully loaded the kernel on boot.
Enable Space Reclamation on RPis
Log in to each RPi that is netbooting off of iSCSI and enable fstrim.timer in systemd. Then either reboot or manually start the service.
Enable Zram and Disable Swap.
$ sudo dphys-swapfile swapoff
$ sudo dphys-swapfile uninstall
$ sudo systemctl stop dphys-swapfile.service
$ sudo systemctl disable dphys-swapfile.service
$ sudo systemctl mask dphys-swapfile.service
$ sudo apt-get install zram-tools
Credits & Acknowledgments
This blog came from lots of quality snippets taken from other guides and technical articles, but I wanted to give praise and link back to both the Network boot your Raspberry Pi – Raspberry Pi Documentation, as well as Net boot (PXE + iSCSI) with a RaspberryPi 3 – darknao’s stuff
Both guides are some of the best I’ve seen covering this topic. Hopefully, this guide will synthesize knowledge from both to give a more complete picture and fill in more gaps to the process.
Conclusion
I hope this guide has been helpful to you. Please feel free to leave comments questions and feedback in the comments section below
Discover more from Warmest Robot + Warmest Human
Subscribe to get the latest posts sent to your email.
Thanks for great info I was looking for this info for my mission.
Thanks for the feedback!
Thank you for this great guide, which I am going to follow for my Zigbbee2MQTT RPi 4. Unfortunately, there are some pictures missing in the chapter „Preparing the RPi 4B for network boot“.
Best regards!
Thank you for the feedback. I will repair those images.
Images should now be repaired!
Hi John,
This looks like a great How-To guide. I don’t have a Synology NAS ( yet : ) and I haven’t quite read through the whole post yet, but I wanted to pass on something I noticed. A lot of the image, particularly early on in the post it seems, use a related but non functional domain in their source address.
For instance, the Raspberry Pi Boot Process diagram uses this source address, which causes it to not load –
https://warmestrobot-com.preview-domain.com/wp-content/uploads/2024/08/RaspberryPiBootProcess.png
I did a test and changed warmestrobot-com.preview-domain.com to warmestrobot.com in the image address and it loaded. Thought you might want to know about it, so you could fix those.
Thanks for the great content. I haven’t read anything else you’ve written yet, but I’m going to sign up for your mailing list and see what comes through!
Cheers,
-Dave.
David,
Thanks for reaching out! There was some residual WordPress mayhem from my conversion out of SquareSpace. I’ve updated the HTML links and it should be pristine again. Thanks for reading! Enjoy the blog!
Whoops, that image issue must have just crept up recently. I missed the post by Mirko earlier today.
Sorry for the duplication there!
-Dave.
It’s great knowing folks read my content! Again, thanks for taking the time to reach out!
Thanks for the great how-to. Several things I noticed when doing my latest Raspberry Pi OS bookworm setup on a Raspberry PI 5:
– It appears the touch /etc/iscsi/iscsi.initramfs isn’t necessary anymore — when I installed open-iscsi — a post-install trigger automatically rebuilt the initramfs with iscsci support. I did not have to regenerate the initramfs myself. It appeared to properly drop the right files into /boot/ and /boot/firmware automatically.
– I think (it appears) that the boot firmware supplied now also is automatically including the initramfs (I did not have to edit config.txt to add initramfs).
– For fstab — i just commented out the root definition — since the kernel cmdline.txt is mounting it anyway. In my case I build an initial raspberry pi os lite image file on the iscsi target — to have available for cloning and expanding into my real production OS targets – so didn’t want to have to keep editing that file.
– Is there any reason for the ip=::::raspberry-01:eth0:dhcp syntax in the cmdline.txt? I just used ip=dhcp and things appeared to worked fine. I did deactivate wifi when creating my root image.
– For the raspberry pi 5 – I was able to avoid putting bootcode.bin in the root of tftpboot and just have it under the subdirectory and the network boot appeared to work fine. I’m not sure if that will hold true for my remote Pi3B setups when I do them… but I really hope I can avoid it. (or at least just force a specific file via dhcp option 67).
HI,
Thank you for awesome guide but i can get it to work. I’m wondering about th point 33. – “Next, you will need to delete some legacy unused reference files in /mnt/RPI_Serial. Then create symbolic links to items within the /mnt/RPI_Serial/firmware directory as a workaround, as the new file locations are not compatible with the expected locations required during network boot:”. Should thi be done with NFS (/volume1/tftpboot) mounted under /mnt or the /dev/sda ? The piont 33 is right after mounting the LUN into /mnt but then you wrote “/mnt/RPI_Serial/firmware” which cant be in the /mnt directory as it is LUN and we copied only the particular directories from root on SD card.
Mark,
I recommend referencing the script that I’ve provided at https://gitlab.com/jnicpon/rpi-prep/ for the specific answers you are after. Using my scripts are much easier than doing the configuration manually by hand.
Thank you for reading and I’m glad you enjoyed the article!
-John