OpenTable Affiliate Referral Links:
A Python Project – Setting Things Up
Part 1
Teri recently applied and was accepted as an OpenTable Affiliate, so that we can provide the convenience of online OpenTable reservations to our readers. What we received is a useful branding press kit, some branding requirements, and the credentials and URIs for accessing a RESTful API. I love the opportunities to work on my Python skills, as well as learn new things, but I’m a bit baffled why OpenTable doesn’t offer a simple WYSIWYG widget builder for affiliates that are restuarant gurus not programmers. Obviously, the RESTful API is awesome for programmers and the Warmest Robot, but the Warmest Human thought it was a bit much to ask of a non-technical user. With a widget builder, OpenTable Affiliates could build a referral link that meets branding requirements without having to ask an INTP for help. I’ve decided to help others on the net by posting my method and code in series of articles.
The Environment
I’ve been drafting a blog article since early August about my new favorite development combo:
- Docker Toolbox (Windows 10) / Docker CE on Linux
- PyCharm Professional (Windows / Linux)
- Python 3
For some time at work, I have been evaluating ways to support containers in our enterprise. While an enterprise container environment has not yet been mandated, I figure the sheer popularity of the Docker platform will eventually result in building infrastructure to support the platform for the university. Since we are largely a VMware shop, we are currently evaluating vSphere Integrated Containers as a possible solution; however, since I am new to Docker, I’ve been working with a combination of Docker Toolbox, PyCharm, and Python 3 on my various computers to convert my legacy Python virtualenvs into proper Docker containers. My goal is to containerize my code so that items can be run on-demand without having to maintain specialized environments and a ton of dependencies.
So far, I’ve found it super easy to build and convert all my Python projects by setting up a Docker remote interpreter in PyCharm. While I’ve been using Windows 10 as my main OS between home and work, I’ve opted to not transition to using the new Docker for Windows, as the PyCharm integration continues to work best with Docker Toolbox. While I’m sure that JetBrains, the makers of PyCharm will work out all the kinks, I lack the motivation and patience to fight with inconsistent support for all facets of Docker for Windows. Also, I am a big fan of Oracle VirtualBox for running small VMs vs Hyper-V, as VirtualBox is closer to VMware Workstation and offers Python SDKs.
If the idea of using an IDE seems too complex vs. a robust text editor, I can tell you that I’ve tried several different tools and methods, but PyCharm is hands down the best Python development environment. JetBrains also has a very awesome deal for students and teachers that gives you full access almost their entire catalog of products. Also, they have a community addition of PyCharm available for opensource community projects. Once you get used to their interface, its very easy to customize the IDE and transition between their other IDES and tools without much effort. I also highly recommend their DataGrip program. It is a versatile standalone multi-database tool. While PyCharm has extensive database support for building queries and exploring schema, DataGrip offers a more full featured experience, it also saves you from jumping between different, jarring interfaces. With it I don’t find myself needing PHPMyAdmin, Navicat, or Toad.
For the neckbeards and code warriors out there, I learned Python 3 before dabbling in the legacy Python 2. Even though many Python 2 libraries are still not ported to Python 3 and stubborn Linux distributions still use Python 2 as the default interpreter, I exclusively code in Python 3 because Python 2 has been officially deprecated for years and I’m more comfortable with 3. Plus, if you are deadset on still using Python 2, I’m sure you’re smart enough to adapt my code, as I always try to keep things simple and well commented.
It’s beyond the scope this article to assist with the installation of Docker Toolbox/Docker CE, PyCharm, or Python. All are straight forward installations and are well documented. I will share how I configure PyCharm to use Dockerized Python:
- Create a PyCharm Python Project. I called my project opentable-api, but the name of the project is irrelevant other than it impacts the names of folders that PyCharm creates.
- Once the project is created, I used PyCharm to create 2 blank files: Dockerfile & requirements.txt in the root of the project.
- Populate your Dockerfile and requirements.txt files. I’ve provided examples that I’ve used for this project below.
- Create a local Docker Image for your project. In this case, I called my Docker Image opentable-api to keep things organized.
- Open the terminal you use to run Docker commands. On Windows/Mac with Docker Toolbox, this is most likely called Docker Quickstart and on Linux it’s pretty much any shell you’d like.
- Change directories so that your are inside of your PyCharm project folder.
- Execute the following command:
$ docker build -t opentable-api .
Dockerfile Example:
# Base Image
FROM python:3.6-slim

# Set Working Directory
WORKDIR /app

# By copying over requirements first, we make sure that Docker will cache
# our installed requirements rather than reinstall them on every build

COPY requirements.txt /app/requirements.txt

# Install any needed packages specified in requirements.txt
RUN pip install -r requirements.txt
requirements.txt Example
requests
pandas
For this I pull an official Python 3 image that uses a slim Debian environment. Take note, that the Dockerfile also expects a requirements.txt file in the same directory as the Dockerfile to feed all Python module requirements to the pip command which will install them into the container after it is instantiated. If this seems more complex than a manual installation of the dependencies, I’d like to point out what benefits it provides in the long run:
- No messy Python environments with hundreds of dependencies to your code. Only what your program needs is presented in the container.
- No need to setup virtualenvs for different projects to keep the mess under control and switch between them for debugging. It’s all handled via Docker.
- It’s extremely portable. Once you’ve taken the time to setup the container and debug your application, you can easily copy the project folder or just your source code, Dockerfile, and requirements.txt to another environment and have it running again, the same way, in seconds.
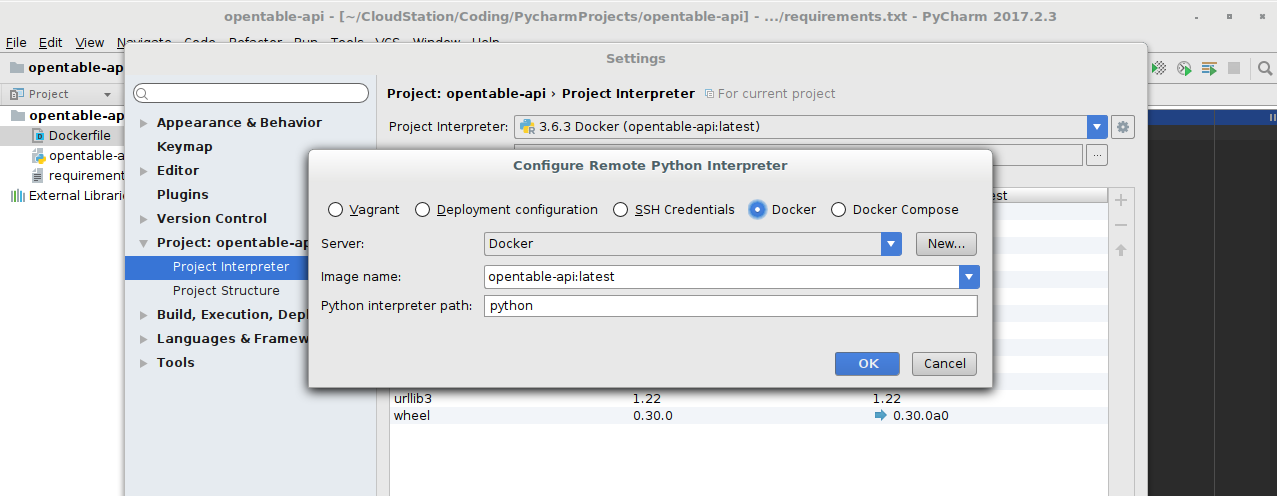
Add a remote Docker Interpreter and Console to PyCharm.
This process is essentially the same process on all platforms in PyCharm; however the UI themes and the slight variations between Docker Toolbox/Docker CE will cause the PyCharm configuration fields to display slightly different data. Most distinctly, Docker Toolbox calls it’s default instance ‘default’ while Docker CE calls it Docker, but functionally they are the same. Here’s what you need to do in PyCharm:
- Add a remote interpreter in PyCharm Pro.
- Add a remote console in PyCharm Pro. This completed from the Settings/Build, Execution, Deployment/Python Console/Python Interpreter.
After updating these settings, PyCharm will update the skeleton files and you’re ready to code.
PyCharm Profession in Linux with Docker CE.
Part 2 of this article will focus on the actual set of scripts created to communicate with OpenTable’s API.
Discover more from Warmest Robot + Warmest Human
Subscribe to get the latest posts sent to your email.

